How to Install Wordfence: A Step-by-Step Guide
 2026.02.19 04:22
 petro
petroIf you’re looking to strengthen the security of your WordPress website, installing a reliable security plugin is essential. In this guide, we’ll walk through how to install and configure Wordfence, one of the most popular and powerful WordPress security plugins available.
What is Wordfence?
Wordfence is a comprehensive security plugin designed to protect WordPress websites from a wide range of online threats. It includes an application firewall, malware scanner, login protection tools, and several other features that help keep your website secure.
With over 5 million active installations, Wordfence is one of the most trusted security plugins in the WordPress ecosystem.
Key Features and Benefits
- Web Application Firewall (WAF): Blocks malicious traffic before it reaches your website.
- Malware Scanner: Scans core files, themes, and plugins for known malware and suspicious code.
- Brute Force Protection: Limits login attempts and enforces strong passwords to prevent unauthorized access.
- Two-Factor Authentication (2FA): Adds an extra layer of security to admin accounts.
- Security Alerts: Notifies you about potential vulnerabilities and threats.
Pre-Installation Steps
Before installing Wordfence, it’s important to take a few precautionary steps to ensure a smooth setup.
Note: This guide focuses on the free version of Wordfence.
1. Backup Your Website
Always create a full backup of your WordPress site before installing any new plugin. This ensures you can restore your website if anything goes wrong during installation.
2. Update WordPress and Plugins
Make sure your WordPress core installation, themes, and plugins are up to date. Running the latest versions helps ensure compatibility and improves security.
Installing Wordfence
Step 1: Install the Plugin
- Log in to your WordPress admin dashboard.
- Navigate to Plugins → Add New.
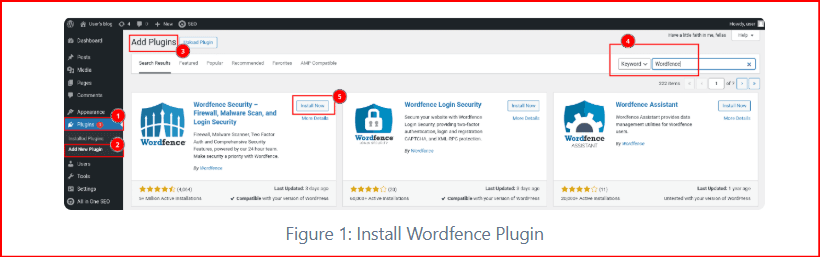
- Search for “Wordfence.”
- Click Install Now.
After installation, click Activate.
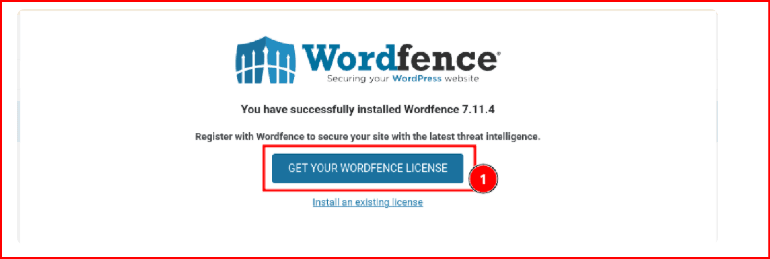
Once activated, you’ll see a prompt to obtain your Wordfence license.
Getting a Wordfence License (Free Version)
Even to use the free features, Wordfence requires registration with a valid email address to receive an activation key.
Step 2: Request a Free License
- Click “Get your Wordfence License.”
- You’ll be redirected to the Wordfence website.
- Choose the Free license option.
Wordfence will inform you that:
- Malware scanning rules are updated monthly in the free version.
- Real-time protection is available in the Premium version.
If you’re comfortable with this limitation, click:
“I’m OK waiting 30 days for protection from new threats.”
Step 3: Register Your Email
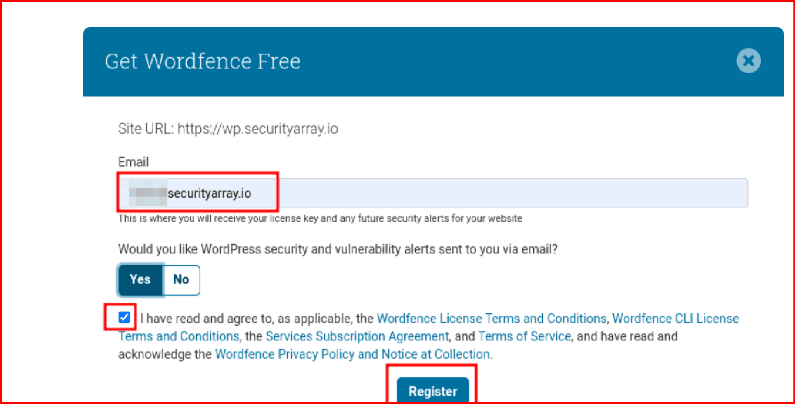
- Enter your email address.
- Subscribe to security updates (optional).
- Accept the terms and conditions.
- Click Register.
You will receive an email containing your activation link.
Activating the Wordfence License
- Open the activation email.
- Click “Install My License Automatically.”
If you’re logged into your WordPress site, the license key will automatically populate.
- Click Install License.
You’ll see a confirmation message indicating that Wordfence has been successfully installed and activated.
Wordfence Dashboard Overview
After activation:
Click Go to Dashboard.
- You’ll be taken to the Wordfence dashboard.
You should now see the message:
“Wordfence Protection Activated.”
The recommended default settings are enabled automatically, which are suitable for most websites.
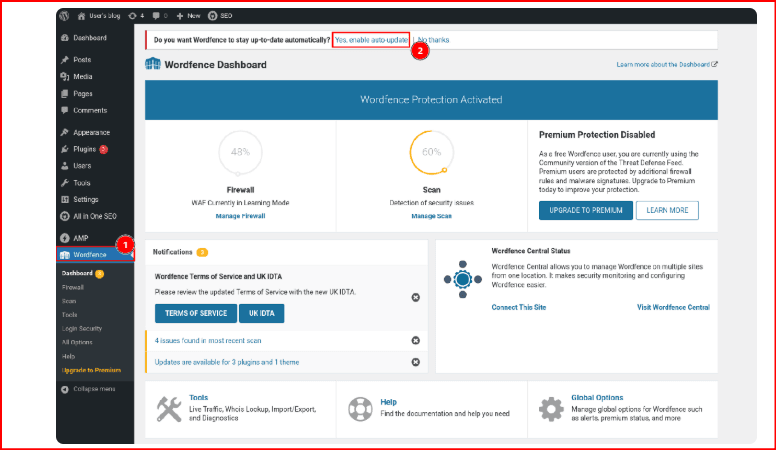
✔️ Make sure to enable auto-updates so Wordfence stays current without manual intervention.
Running a Wordfence Scan
Once installed, Wordfence enables the Standard Scan by default. This provides a solid level of protection for most websites.
To Manage or Run a Scan:
- Go to Wordfence → Scan.
- Click Manage Scan.
The Standard Scan is typically sufficient. However, if you suspect your site may be compromised, you can enable:
- High Sensitivity Scan for deeper analysis.
- Additional options via All Options in the left-hand menu.
Go ahead and run your first scan to check for security risks.
Conclusion
Securing your WordPress website is critical in today’s threat landscape. With increasing attacks targeting WordPress sites, taking proactive steps is no longer optional.
Wordfence offers a powerful set of security features—even in its free version—including:
- Malware scanning
- Firewall protection
- Two-Factor Authentication
- Login security
- Real-time monitoring and try with our tools
By installing Wordfence, you gain better visibility into your website’s security posture and significantly reduce your risk of compromise.
Don’t wait until your site is attacked—activate Wordfence today and strengthen your WordPress security.
 Multi-Account Management
 Prevent Account Association
 Multi-Employee Management
Recommended
See More ![]()