Creating a Simple Text-to-Speech App in App Inventor
 2025.10.18 00:04
 petro
petroApp Inventor Beginner Tutorials
A step-by-step guide for first-time app developers
Whether you're an educator, student, or curious beginner, this set of tutorials will help you get started with App Inventor. No coding experience needed — just follow along!
Tutorial Overview
? 1. TalkToMe Series1.1 TalkToMe – Build your first speaking app (Page 4)
- 1.2 TalkToMe Part 2 – Add shake detection & user input
2. BallBounce
- A simple game that teaches animation with a bouncing ball
3. DigitalDoodle
- Create a drawing app where users can draw on the screen with their finger (Page 47
Tutorial 1: TalkToMe — Your First App
Objective:
Create a simple app that speaks when a button is pressed.
Step-by-Step Instructions
✅ Step 1: Open App Inventor
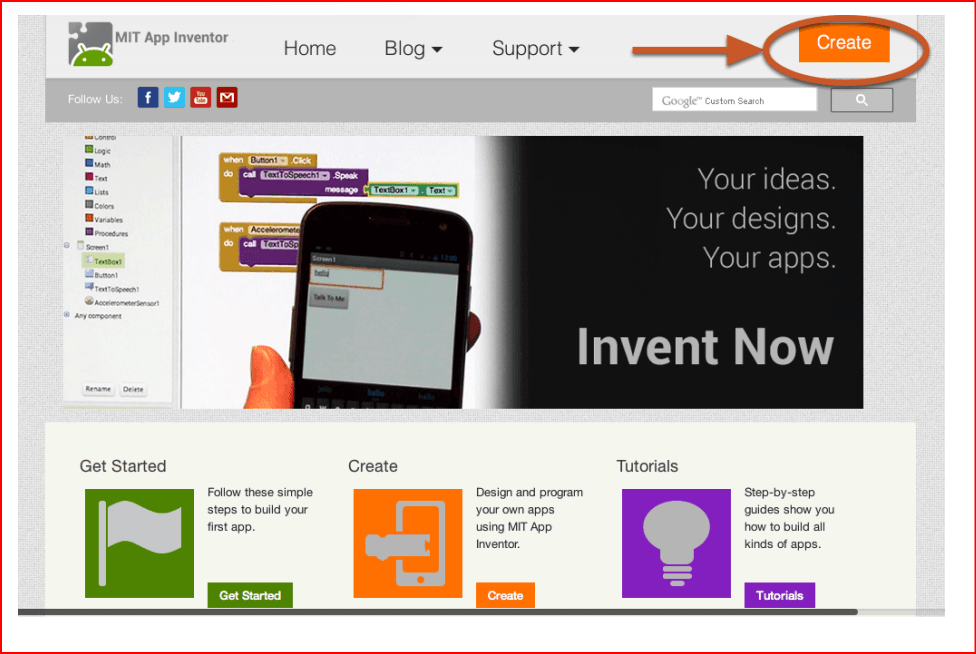
Go to: https://ai2.appinventor.mit.edu
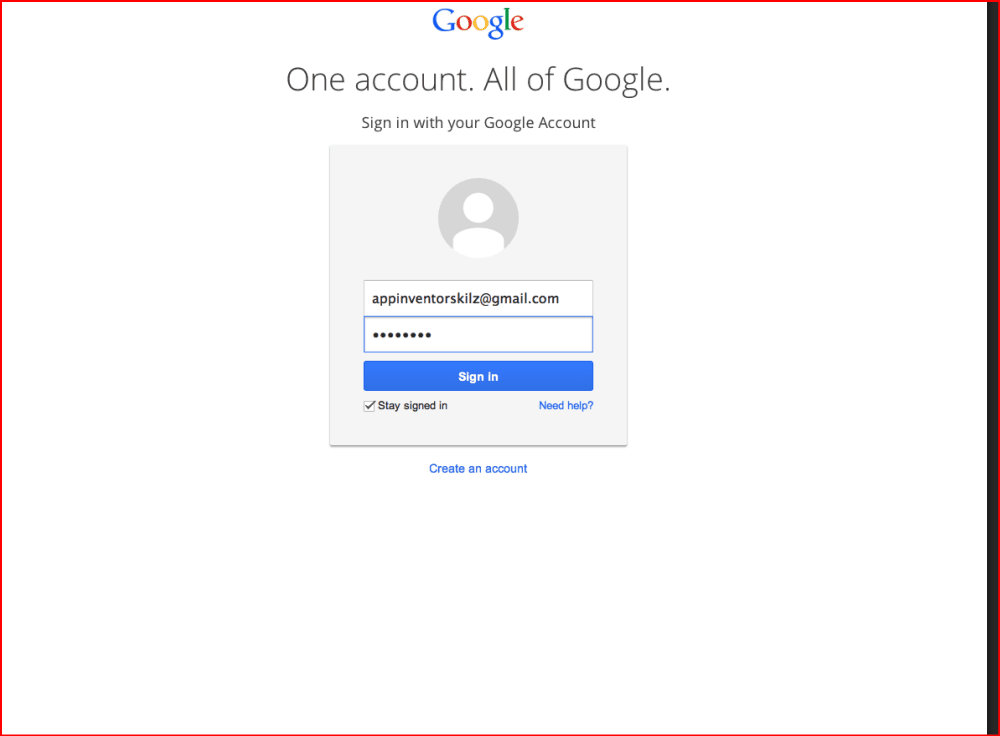
Log in with your Google (Gmail) account. If you don't have one, create it at accounts.google.com/SignUp
✅ Step 2: Start a New Project
Click "Start new project"
Name it:
TalkToMe(no spaces, underscores allowed)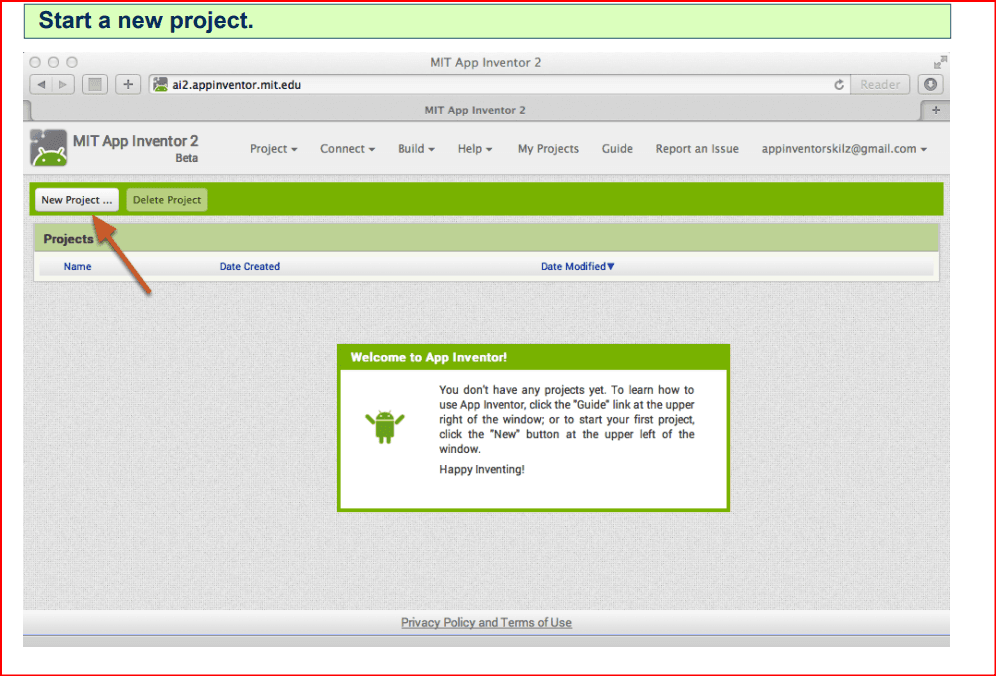
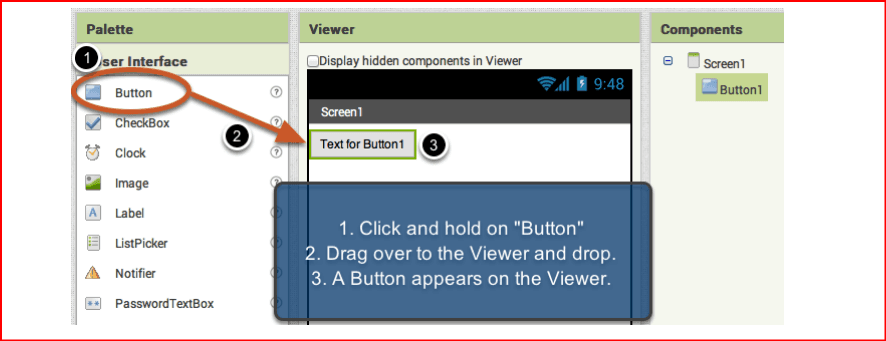
✅ Step 3: Add a Button
- In the Designer tab, drag a Button component from the User Interface drawer onto the screen.
In the Properties pane, change the button text to: "Talk To Me"

✅ Step 4: Add Text-to-Speech

- From the Media drawer, drag out a TextToSpeech component.
- It will appear under Non-visible components.
✅ Step 5: Connect Your Phone (Live Testing)
- Download MIT AI2 Companion app on your Android device from the Play Store.
- On your computer, click "Connect" → "AI Companion"
- Scan the QR code with your phone app or enter the 6-character code.
✅ Step 6: Program the App (Blocks Editor)

- Click the Blocks button.
- Drag this event block from the Button1 drawer:
when Button1.Click do
- From the TextToSpeech drawer, drag:
call TextToSpeech1.Speak
- From the Text drawer, drag a text block and set it to say:
"Congratulations! You've made your first app."
- Plug the text block into the Speak block.
Test It!
Press the button on your phone — it should speak the phrase out loud.
Great job! You’ve built your first app!
Tutorial 1.2: TalkToMe Part 2 — Shake Detection & User Input Objective:
Enhance the app to:
- Speak when the phone is shaken
- Say anything typed by the user
✅ Step 1: Add an Accelerometer
- In the Sensors drawer, drag out AccelerometerSensor
- It's a non-visible component
(Note: Skip this step if using the emulator — it doesn’t detect shakes)
✅ Step 2: Add a Text Box
- In the Designer, drag out a TextBox and place it above the button
✅ Step 3: Go to the Blocks Editor
- Add
when AccelerometerSensor1.Shaking do - Copy or recreate the
TextToSpeech.Speakblock - Set the spoken text to:
"Stop shaking me!"(or your own phrase)
✅ Step 4: Use User Input
- Replace the fixed text in the button click block with:
TextBox1.Text(from TextBox1 drawer)
Test It!
Now the app:
- Speaks whatever the user types when they press the button
- Says a custom message when the phone is shaken
Tutorial 2: BallBounce — A Simple Game App
Objective:
Create a game where a ball bounces around the screen and responds to being flung.
✅ Step 1: New Project
- Name it:
BallBounce - ✅ Step 2: Add a Canvas
- From Drawing and Animation, drag out Canvas
- Set Width and Height to Fill Parent
- In Screen1 properties, uncheck Scrollable
✅ Step 3: Add a Ball
- From the same drawer, drag out a Ball component onto the canvas
- Adjust its Radius in the Properties pane if needed
✅ Step 4: Program Ball Movement
- In the Blocks editor:
- Use
when Ball1.Flung - Set:
Ball1.Heading→ toget headingBall1.Speed→ toget speed
- Use
✅ Step 5: Add Bounce Behavior
- Use:
when Ball1.EdgeReached- Inside, use
call Ball1.Bouncewithget edgeparameter
Test It!
Fling the ball across the screen. It should bounce off edges.
Try customizing with:
- Different ball colors
- Speed decay
- Obstacles
Tutorial 3: DigitalDoodle — Drawing App
Objective:
Create a drawing app where users can draw with their fingers.
✅ Step 1: New Project
- Name it:
DigitalDoodle
✅ Step 2: Add a Canvas
- From Drawing and Animation, drag a Canvas onto the screen
- Set Height and Width to Fill Parent
- Uncheck Scrollable in Screen1 properties
✅ Step 3: Program Drawing
- In the Blocks Editor:
- Use
when Canvas1.Dragged - Use
call Canvas1.DrawLinewith:startX→prevXstartY→prevYendX→currentXendY→currentY
- Use
Test It!
Drag your finger — a line should appear!
Extend the app with:
- Ink color choices
- Background images
- Dots or circles
- Take a picture and doodle on it Congratulations!
You’ve now completed 4 foundational tutorials using App Inventor:
- ✅ TalkToMe
- ✅ TalkToMe Part 2
- ✅ BallBounce
- ✅ DigitalDoodle
These lessons cover the basics of UI design, event handling, sensors, drawing, and animation — everything you need to start building creative mobile apps.
Next Steps
- Explore advanced tutorials like PaintPot, Magic 8 Ball, or Mini Golf
- Try using Speech-To-Text, Firebase, or external sensors
- Join the App Inventor community at: appinventor.mit.edu
 Multi-Account Management
 Prevent Account Association
 Multi-Employee Management
Recommended
See More ![]()