8 Methods to Bypass IP Bans Quickly [Access Blocked Sites Easily]
 2025.06.26 10:14
 BitBrowser
Have you ever tried to log into Roblox, Discord, Fortnite, or even Reddit, only to be greeted with an error message saying your IP has been banned? I've been there, too. Whether you're managing multiple social media accounts, running ads, or scraping data, getting your IP banned can feel like hitting a brick wall. Suddenly, you're locked out, frustrated, and scrambling for solutions.
The truth is, IP bans happen more often than you think—especially if you're juggling tasks that websites consider "suspicious." But here's the good news: There are proven ways to get around these restrictions without losing productivity. In this guide, I'll show you how to bypass IP bans, from quick fixes to advanced tools like BitBrowser that keep you one step ahead. Let's dive in and reclaim your access!
8 Proven Methods to Bypass IP Bans and Access Restricted Content
Getting hit with an IP ban can feel like a dead end, but it doesn’t have to be. Whether you’re blocked from gaming platforms, forums, or social media, there are seven practical methods you can use to get around the restriction and regain access. Some are quick and simple, others are more advanced.
If you're after a solution that completely shields you from future IP bans, skip ahead to Method #5—it’s the most reliable long-term strategy. Already been blocked from platforms like Instagram? This Instagram IP ban guide can help you get back online fast.
1. Change Your IP with a VPN
One of the fastest ways to bypass an IP ban is to hide your IP address using a VPN. A VPN (Virtual Private Network) reroutes your internet traffic through a remote server, giving you a new IP and masking your real one. It’s perfect for getting around regional blocks or temporary bans. However, free VPNs often share the same IP address across thousands of users, meaning if one user gets blacklisted, you might get blocked too.
Step 1. Choose a reliable VPN provider
Avoid free services. Go with premium options that offer dedicated IPs, like NordVPN or Surfshark. These reduce the risk of shared bans.
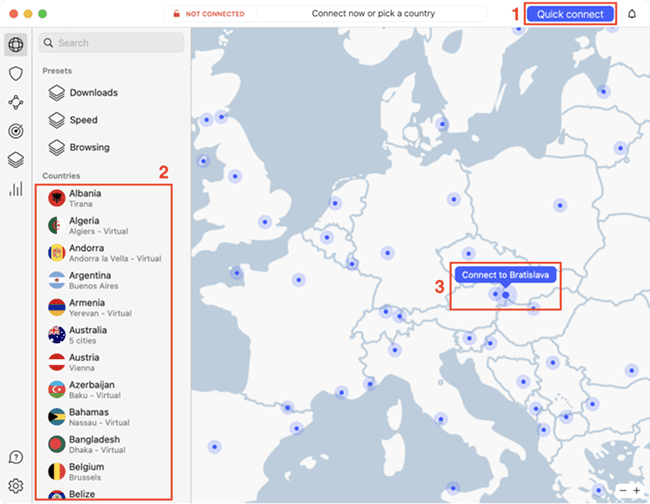
Step 2. Connect to a nearby server
Pick a location close to your target service to reduce lag. If you’re trying to unblock a U.S. site, connect to a U.S. server.
Step 3. Clear cookies and cache
Even with a new IP, old browser data can leak your location. Clear it before logging back into the blocked platform.
2. Customize Your IP via Proxy
Among ways to change IPs, if you need more customization or plan to manage multiple connections, proxies offer more granular control than VPNs. A proxy acts as a middle layer between your device and the internet, letting you route your traffic through a specific IP address. For example, you can use a residential proxy from Texas to mimic a real user in that area. While setup can be tricky, proxies are often better for automation, scraping, or account management across different platforms.
Step 1. Pick your proxy type
Use residential proxies for stealth (they look like real users), or data center proxies for speed. Providers like Bright Data or Smartproxy are popular choices.
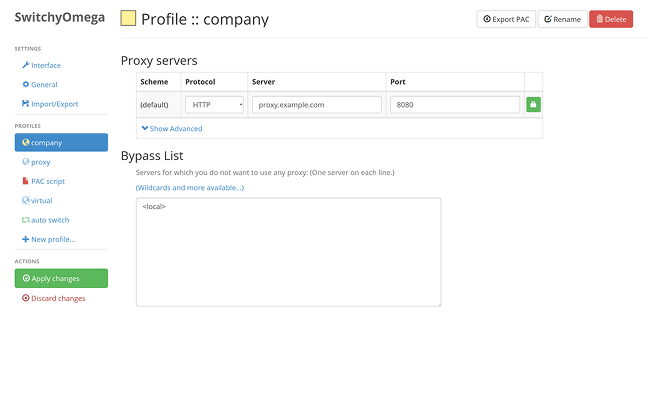
Step 2. Configure your proxy manually
In your browser or app, input the proxy IP, port, and login credentials. For Chrome, tools like Proxy SwitchyOmega simplify the process.
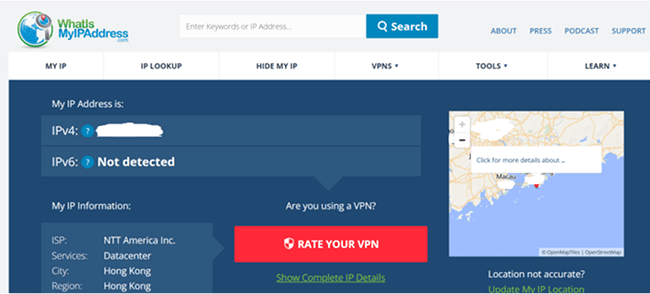
Step 3. Confirm your new IP
Visit whatismyipaddress.com to check if the proxy or VPN has released your IP address successfully.
3. Try the Tor Browser
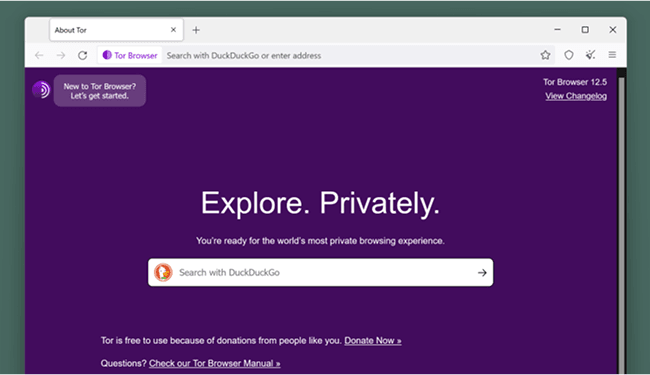
The Tor Browser helps you surpass blocked sites by routing your traffic through multiple random nodes worldwide. This multi-layered encryption hides your identity and effectively fake your IP address, making it harder for websites to track or block you directly.
But it comes with trade-offs: browsing is slow, and many advanced platforms—like Facebook, TikTok, or Discord—use techniques like browser fingerprinting or behavior analysis. So even if you hide your IP, you might still be flagged. For a method that works consistently, see Method #5.
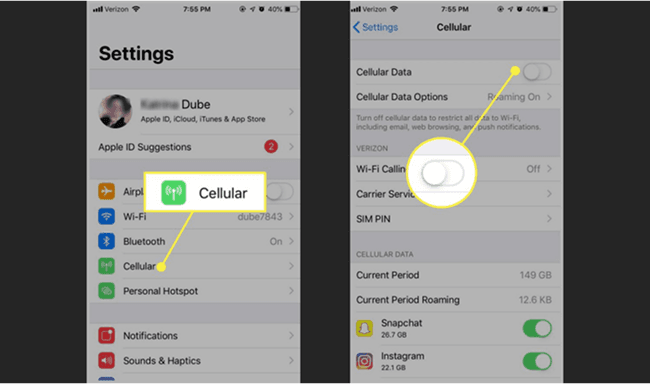
4. Use Mobile Data or Switch Networks Temporarily
If you're facing a temporary IP ban, one of the quickest fixes is simply switching to a different network, like using your mobile hotspot instead of your Wi-Fi. Mobile networks assign dynamic IP addresses, which means your new connection may bypass the block instantly.
This method is great because it’s simple, convenient, and requires no technical setup. Just disconnect from your home network and reconnect via mobile data, a nearby public Wi-Fi, or even a VPN-free browser profile.
However, it's not a guaranteed solution. Many platforms track more than just your IP—they may also recognize your device, cookies, or account behavior. In those cases, switching networks won’t help you get around internet restrictions fully.
Still, if you're trying to unblock blocked sites quickly and just need short-term access, this is one of the fastest tricks.
5. Mask Digital Fingerprints
When I struggled with IP bans while managing client accounts, BitBrowser became my go-to fix. Unlike basic VPNs, it lets you assign a unique proxy IP to each browser profile—like giving every account its own "digital passport." This helps you do almost anything you want, like browsing the Internet privately, etc.
But it's not just about IPs. BitBrowser clones real device fingerprints—screen size, fonts, even your device's timezone—to make every profile look like a separate phone or computer. No more "suspicious activity" flags. Using tools like BitBrowser, the best antidetect browser, you can assign a dedicated proxy IP to every profile, giving each account its own "digital passport." This approach helps you bypass blocked sites at work or anywhere else without triggering suspicious activity flags. It’s the most reliable way to stay under the radar and avoid IP bans long-term.
What Makes BitBrowser the Best Option to Bypass IP Bans:
•Unique IP Binding: Assign a dedicated proxy IP to each browser profile, no more linked accounts triggering bans.
•Fingerprint Customization: Auto-generates random device fingerprints (like screen resolution, fonts, and time zones) to trick website detectors.
•Anonymous Proxy Support: Mask your real location with HTTP/Socks5 proxies (works seamlessly with providers like Bright Data).
•Team Collaboration Safeguards: Share accounts with teammates while keeping IPs and fingerprints isolated—zero cross-contamination.
•Multi-Account Management: Allow you to create and run multiple social media accounts without being associated or suspended via IP detection.
How to Get Around an IP Ban with BitBrowser
The process of bypassing IP bans with BitBrowser is quite easy and simple, because BitBrowser takes user experience very seriously. Here is a quick guide to IP ban fix.
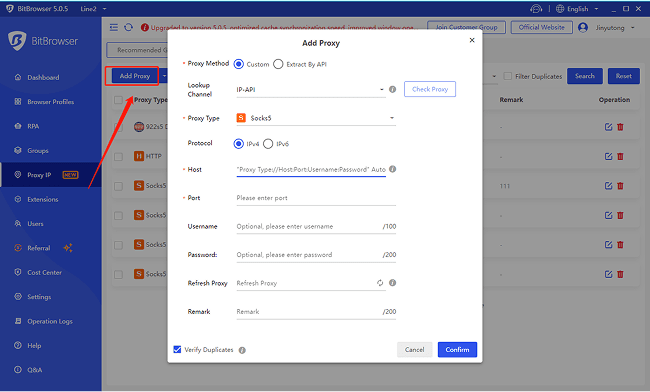
Step 1. Create a New Proxy
Launch BitBrowser and go to the "Proxy IP" section. Click on the "Add" button to open a new pop-up window.
Step 2. Customize Proxy Settings
Fill in the required fields, such as proxy type, host, port, etc. Then, hit "Confirm" to save the proxy.
Step 3. Bind the Proxy with a Profile
On the same tab, click the "Bind" button. Then, on the "Bind Profile" window, choose a browser profile you want to bind the proxy with and click "Confirm".
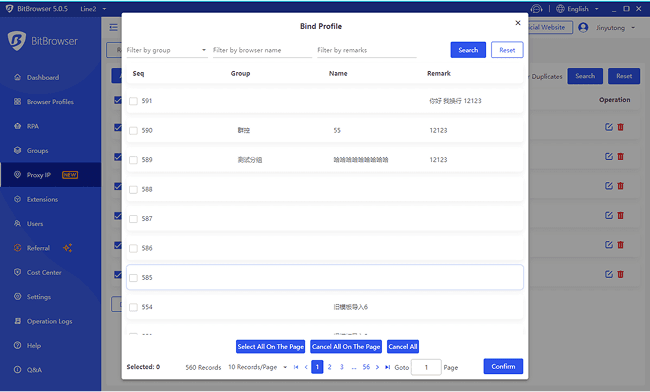
After all this, you are ready to go! With the newly assigned proxy IP, you can open the profile to visit the previously blocked website freely. No more IP restrictions!
6. Change Your MAC Address
Your MAC address acts like a hidden ID for your device's network card—it's not visible to websites, but your local network (like your home Wi-Fi) uses it to recognize you. Changing it can help partially hide your identity, but only if you also switch your IP and browser fingerprints. Otherwise, it's like changing your shoes while wearing the same bright red jacket—you'll still get spotted.
For Windows:
Step 1. Open Device Manager
Press
Win + X and select Device Manager from the menu.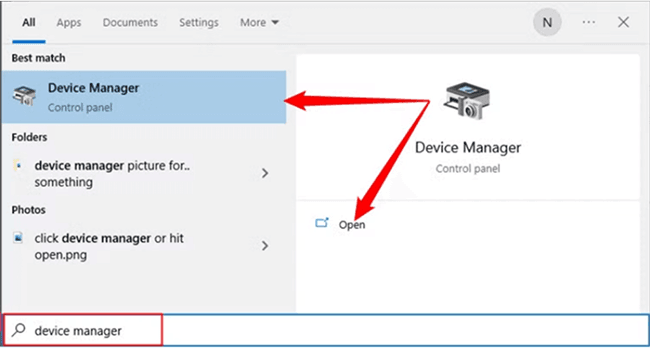
Step 2. Locate your network adapter
Expand Network adapters, right-click your active adapter, and choose Properties.
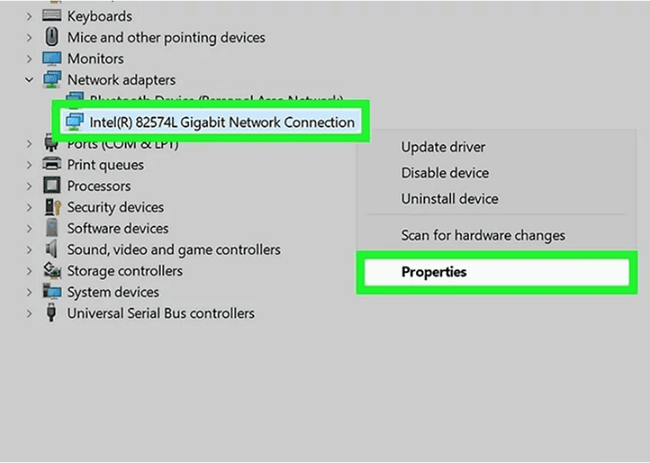
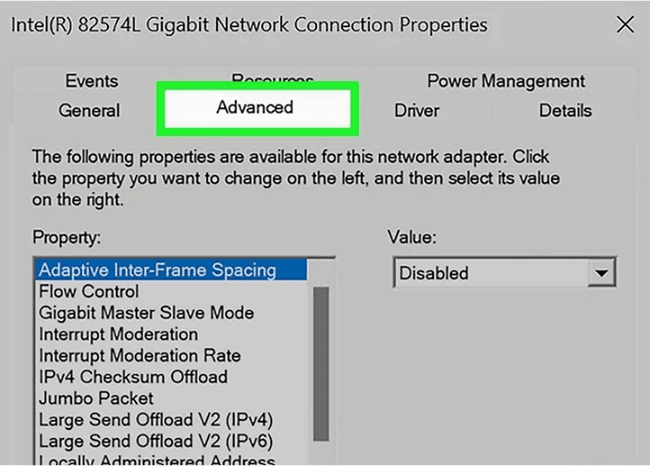
Step 3. Set a new MAC address
Go to the Advanced tab, select Network Address, and enter a new 12-digit code (e.g., A0B1C2D3E4F5).
Step 4. Restart your device
Reboot your computer to apply the MAC address change.

For Mac:
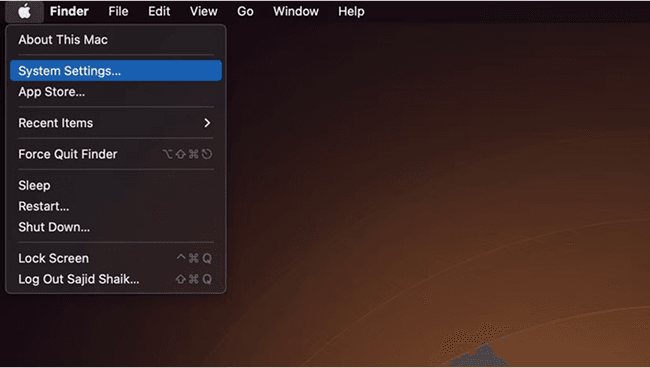
Step 1. Open Network Settings
Click the Apple icon, go to System Settings, then select Network.
Step 2. Access your connection details
Choose your active network, click Details, then go to the Hardware section.
Step 3. Enter a new MAC address
From the dropdown menu, select Manually, then type your new MAC address.
Step 4. Reconnect to the network
Disconnect and reconnect to activate the new address.
7. Clear Browser Cache and Cookies
Sometimes, a quick cache cleanout can temporarily bypass IP bans. Websites don't just track your IP—they leave cookies and browser data that act like breadcrumbs. Even if you switch IPs, these crumbs can still link your new address to the banned one. Clearing them resets the trail, making the site think you're a fresh visitor.
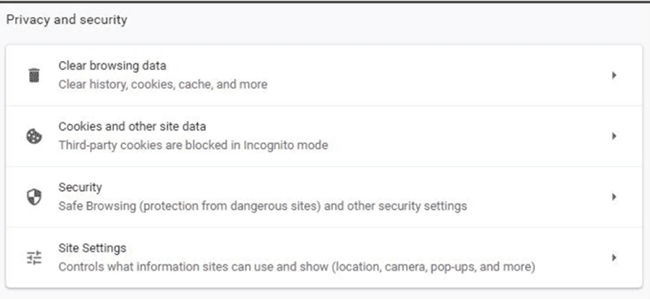
Step 1. Open your browser settings
Go to Privacy & Security in your browser’s settings menu.
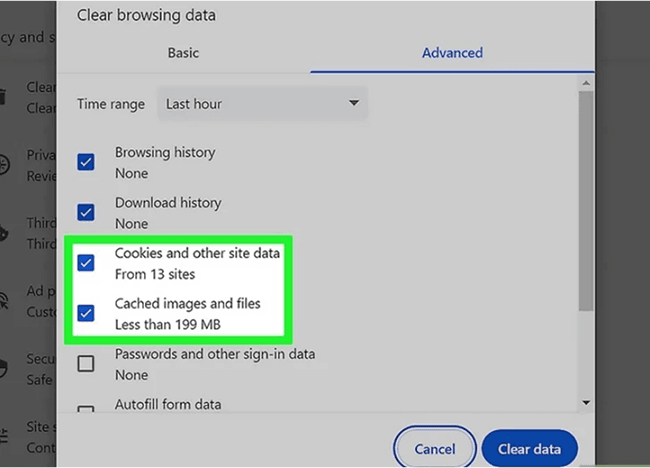
Step 2. Clear browsing data
Click Clear Browsing Data, then check Cookies and Cached Images.
Step 3. Set time range and confirm
Select All Time as the time range, then click Clear Data to remove them.
8. Uninstall or Reinstall Browsers/Apps
Sometimes, simply uninstalling and reinstalling your browser or app can help bypass IP bans, especially if the block is tied to cached data or corrupted files. This method is easy and convenient, requiring no technical skills.
However, its success rate is often low—there’s a high chance you might get blocked again since your IP or device info remains the same.
How to do it
On Windows, open Control Panel, select Programs & Features, then right-click the app or browser and choose Uninstall. After that, reinstall and try to unblock YouTube or other restricted sites.
[Extra] Why Your IP Address Gets Banned from a Website
Understanding why your IP gets banned is key to effectively bypass website restrictions. Websites block IPs to protect themselves from suspicious activity, spam, or abuse—knowing the reasons helps you avoid getting locked out again.
What Is an IP Ban and How Does It Work?
Every device online—your phone, laptop, or tablet—has a unique IP address that tells websites where to send data. Without it, you couldn't load a webpage or stream a video. But here's the catch: this address also lets websites track you.
An IP ban happens when a website blocks your address entirely. Once your IP has been banned, you're stuck unless you mask or change that digital "home address." The key is to stay invisible while staying active. Understanding what an IP block is helps you know how to avoid it next time.
Common Triggers for an IP Block
So why would a website block your IP? It's rarely personal—most bans happen because the site detects behavior that breaks its rules. Let me break down the most common reasons I've seen:
1.Managing multiple accounts from one IP. Sites like Facebook or Amazon flag this as "suspicious activity." Even if you're legitimately handling client accounts, using the same IP links them together, risking mass bans.
2.Running automated bots or scripts. Scraping data or performing bulk actions (like sending messages) can overload servers. Sites block IPs doing this to protect their resources.
3.Sudden location changes. Logging in from New York and then Germany an hour later? Security systems interpret this as a hacked account.
4.Violating community guidelines. Posting spam, hate speech, or illegal content often leads to instant IP bans—no warnings.
5.Sharing IPs with bad actors. Public Wi-Fi or cheap proxies might already be blacklisted because someone else abused them.
The bottom line? Websites aren't just targeting you—they're reacting to patterns.
How many times can you dodge before getting banned?
You can typically dodge an IP ban about 1 to 2 times per day before the system detects suspicious activity and enforces the ban again. Frequent switching or dodging raises red flags, so it’s best to combine this with other methods for longer-term access, for example, BitBrowser.
How Long Do IP Bans Last?
The duration of IP bans varies depending on the website or service:
•Temporary IP Bans: These usually last from a few hours to several days. They are often applied for minor issues like excessive login attempts or suspicious activity.
•Permanent IP Bans: These are meant to last indefinitely, typically for serious violations like repeated abuse or fraud. Sometimes they can be appealed or reversed, but generally, they block access permanently.
5 Tips to Avoid Getting IP Banned Again
Bypassing bans is helpful, but preventing them saves time and headaches. After years of trial and error, here's what I stick to:
1.Rotate IPs like socks. Don't let one IP handle all your tasks. Use tools that auto-switch IPs every few hours.
2.Invest in clean proxies. Cheap proxies are like used toothbrushes: Someone else's problems become yours. Stick to trusted providers with fresh residential IPs to help get unbanned from Facebook Marketplace and other platforms.
3.Act human, not robotic. Space out your clicks. Randomize browsing times. Websites track how you behave, not just your IP.
4.Isolate everything. One browser profile = one IP + one fingerprint + one set of cookies. Mixing them is how IP bans snowball.
5.Test your setup. Before scaling up, visit IPLeak.net to check for DNS or WebRTC leaks that expose your real IP.
FAQs about IP Bans
Does resetting a router bypass an IP ban?
In some cases, resetting your router will assign you a new IP address from your ISP. This will help you bypass the IP ban.
Can IP bans be reversed?
You have several options to reverse an IP ban. You can use proxy servers as middlemen between your device and the internet. VPNs are another choice. The BitBrowser is also an option.
Conclusion
IP bans are frustrating, but they're not unbeatable. Over the years, I've tried every trick: VPNs that slowed my connection, proxies that died mid-task, and endless cache cleanups that barely worked. However, if you have the right tool, how to bypass IP bans will no longer be an issue for you.
If you're managing multiple accounts or scraping data, half-measures won't cut it. You need airtight IP masking and fingerprint spoofing. That's why I rely on BitBrowser daily. It bundles everything—proxy management, device simulation, team controls—into one tool. No more juggling 10 tabs with different VPNs. The best part? You can start for free. Their free plan gives you 10 profiles, auto-IP rotation, and basic automation. So download BitBrowser now—it takes 2 minutes to set up, and you'll wonder how you ever survived without it.
 Multi-Account Management
 Prevent Account Association
 Multi-Employee Management
Recommended
See More ![]()