6 Methods to How to Emulate Android on PC: Full Experience
2025.05.15 15:54 BitBrowser
Struggling to choose the best Android emulator on PC in 2025? As an app developer, I've faced endless frustrations: laggy gameplay, outdated hardware crashes, intrusive ads, and security risks. Over three days, my team rigorously tested 20+ tools to handpick six reliable solutions for how to emulate Android on a PC.
Whether you're a gamer craving seamless Genshin Impact sessions, a developer testing app compatibility, or a casual user scrolling TikTok on a bigger screen, these emulators deliver. Discover zero-ad clutter options, multitasking-friendly tools, and gaming-focused versions with pre-mapped controls—all optimized for low-spec PCs. Each pick passed performance benchmarks and security checks. Find your perfect match in minutes and say goodbye to lag and pop-ups!
#1 Bit Cloud Phone
Stuck finding the perfect virtual Android environment? As an app developer, I've redefined how to emulate an Android on a PC withBit Cloud Phone. This tool lets you create virtual devices mirroring real-world Samsung, Xiaomi, or Vivo configurations, down to the finest hardware details. Seamlessly download apps via Google Play or drag-and-drop APK files for instant installation, ideal for testing apps or gaming like you're holding a physical device.
Unlike traditional emulators, Bit Cloud Phone's anti-detect engine assigns each virtual device a unique IP, dynamic fingerprint, and regional network traits, tricking platforms into seeing it as a "brand-new phone." Whether you're managing 8 TikTok accounts or 20 e-commerce storefronts on one PC, environments stay isolated and secure.
For developers and power users mastering how to emulate Android apps on PC, this is the ultimate multi-account solution—no lag, no cross-contamination.
More Features of Bit Cloud Phone
If you're exploring how to emulate Android on PC, Bit Cloud Phone stands out with features I rely on daily:
1. Anti-Detect Tech: Every virtual device mimics real hardware (Samsung, Xiaomi, Vivo) with unique IPs and dynamic fingerprints—simulating 30+ parameters like time zones and sensors to avoid bans.
2. Multi-Account Efficiency: Batch-create or reset environments for social media, gaming, or e-commerce, streamlining workflows without cross-account risks.
3. Native Android Compatibility: Access Google Play for apps like TikTok orrun APKs on Windowsvia drag-and-drop, even for region-locked apps.
4. High Performance: Dedicated resources ensure smooth gameplay or Live Streaming Apps, even on low-spec PCs.
5. Security: Anonymous proxies hide your IP, reducing exposure risks.
6. Cost-Effective: Pay as low as $0.03/environment/day—no subscriptions.
7. Cross-Device Sync: Transfer sessions to real phones, using local cameras/files for hybrid workflows.
8. Team Collaboration: Share environments and assign permissions for enterprise-level management.
From testing apps to scaling operations, Bit Cloud Phone redefines how professionals emulate Android on PC.
How to Emulate an Android Phone on PC/Mac with Bit Cloud Phone?
Step 1. InstallBit Cloud Phoneon your computer and launch it to create a new account.
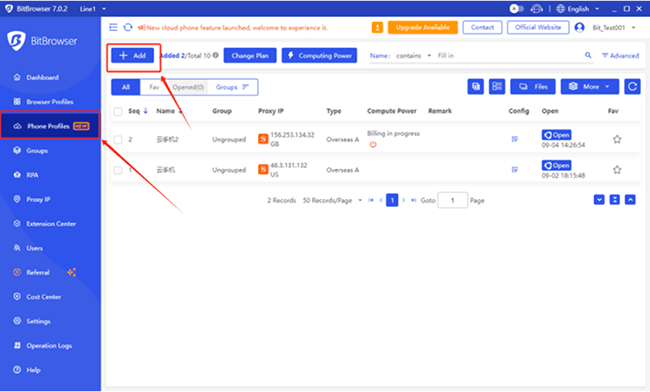
Step 2. Navigate to the "Phone Profile". Then click "Add" to create a new phone profile.
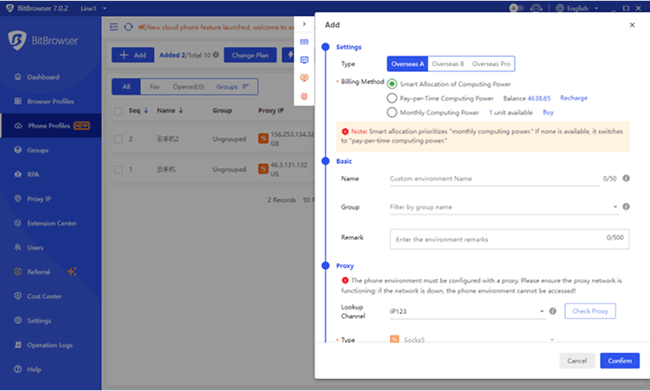
Step 3. Customize settings, such as location, language, or proxy. When you finish, click "Confirm". Then, you have successfully emulated an Android environment.
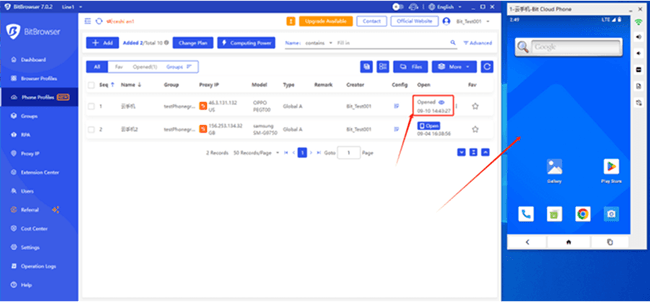
Step 4. Open the newly created phone profile. Then, you can access the Google Play Store to download apps or directly import APK files from other sources.
As an app developer, I consider Android Studio the gold standard for an Android emulator on a PC. Developed by Google, this integrated environment offers a complete toolkit for building and testing apps. It's built-in emulator supports diverse screen sizes, hardware configurations, and Android versions, enabling precise testing across virtual devices. The advanced code editor streamlines workflows with features like intelligent auto-completion and code refactoring, which significantly boost productivity.
While it's unmatched for professional development, the complexity of its interface and setup might overwhelm casual users. For instance, configuring virtual devices requires familiarity with SDK tools and system images. If your goal is simply to run APKs on Windows without diving into development intricacies, solutions like Bit Cloud Phone provide a more straightforward approach. Still, for engineers prioritizing depth and customization, Android Studio remains indispensable.
How to Emulate an Android on Windows 10/11 with Android Studio?
Curious about how to apply Android Studio? I'm going to show you how to emulate an Android on Windows 10/11 with Android Studio. It's gonna be a little difficult, so don't get sidetracked.
Step 1. Download Android Studio.
Step 2. Open Android Studio Setup. Under Select Components to install, select Android Studio and Android Virtual Device. Then, click Next.
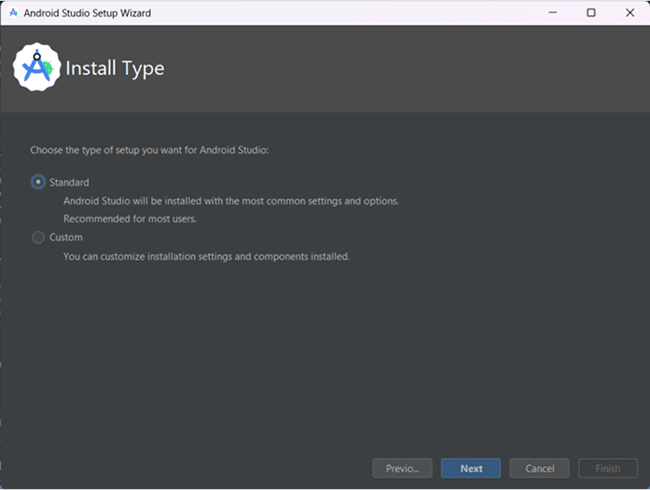
Step 3. In the Android Studio Setup Wizard, under Install Type, select Standard and click Next.
Step 4. The Android Studio Setup Wizard will ask you to verify the settings, such as the version of Android SDK, platform tools, and so on. Click Next after you have verified.
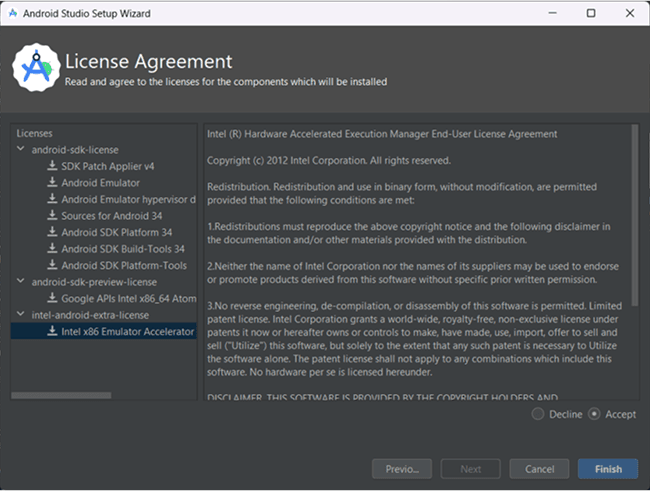
Step 5. In the next window, accept the licenses for all available components.
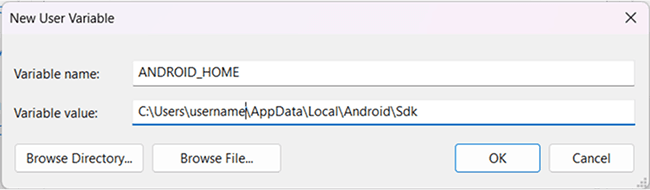
Step 6. After the tools installation is complete, configure the ANDROID_HOME environment variable. Go to Windows Control Panel > User Accounts > User Accounts (again) > Change my environment variables and click New to create a new ANDROID_HOME user variable. The value of this variable will point to the path to your Android SDK:
Step 7. To verify that the new environment variable is loaded, open PowerShell, and copy and paste the following command: Get-ChildItem -Path Env: The command will output all user environment variables. In this list, see if ANDROID_HOME has been added.
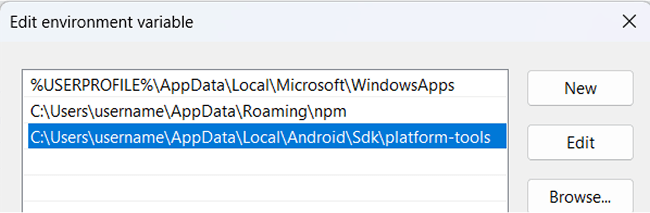
Step 8. To add platform-tools to the Path, go to Windows Control Panel > User Accounts > User Accounts (again) > Change my environment variables > Path > Edit > New and add the path to the platform-tools to the list as shown below:
Step 10. Finally, make sure that you can run adb from PowerShell. For example, run the adb version to see which version of the adb your system is running.
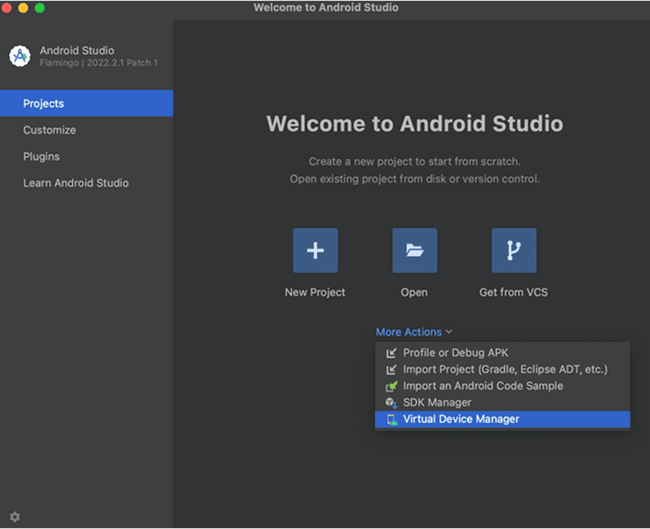
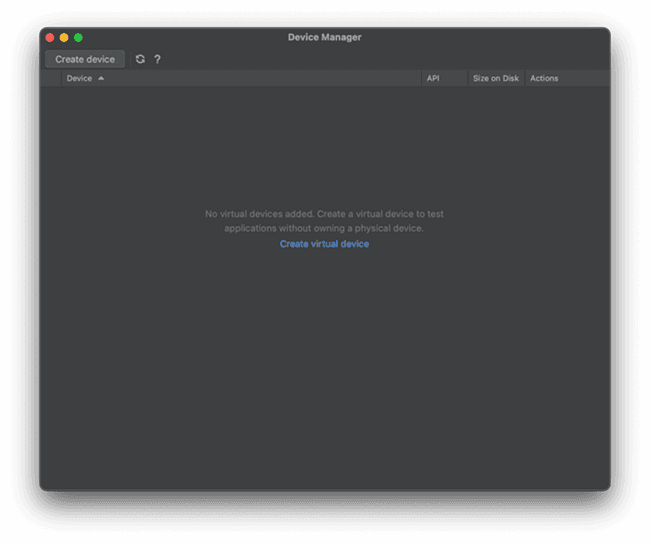
Step 11. On the Android Studio main screen, click More Actions, then Virtual Device Manager in the dropdown.
Step 12. Click the Create device button.
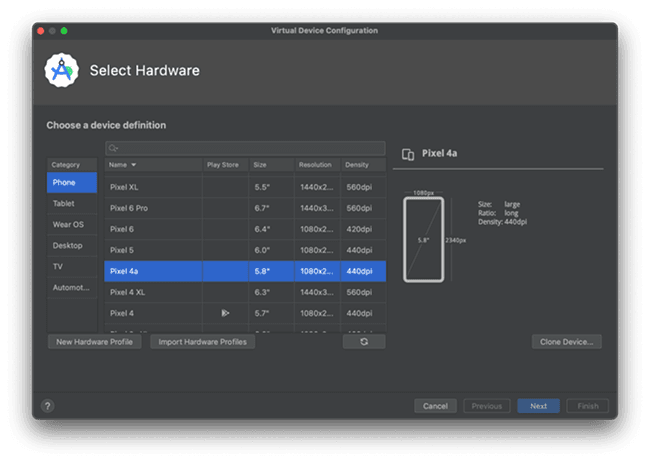
Step 13. Under Select Hardware, choose the type of hardware you'd like to emulate. We recommend testing against a variety of devices, but if you're unsure where to start, the newest device in the Pixel line could be a good choice.
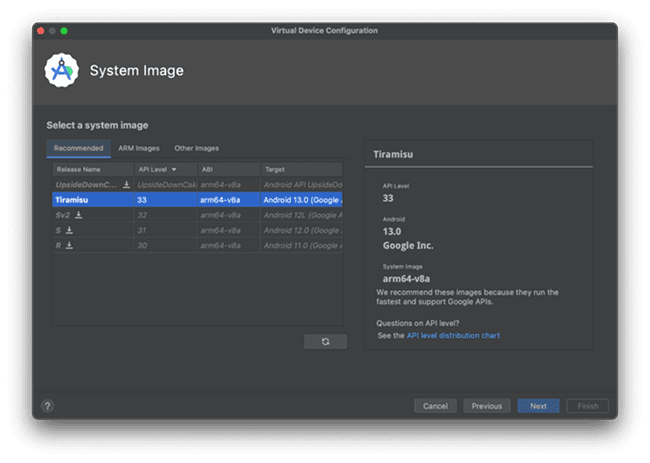
Step 14. Select an OS version to load on the emulator (probably one of the system images in the Recommended tab), and download the image.
Step 15. Change any other settings you'd like, and press Finish to create the emulator. You can now run this emulator anytime by pressing the Play button in the AVD Manager window.
#3 LDPlayer
As an app developer, I've found LDPlayer to be a reliable Android emulator on PC, particularly for users with low-end hardware. Its lightweight design ensures smooth performance even on older machines, making it a top choice for gamers seeking stability. The emulator supports up to 120 FPS, delivering buttery-smooth visuals for demanding titles, and offers granular controls over CPU cores, RAM allocation, and DPI settings to optimize resource usage.
Regular biweekly updates expand compatibility with trending mobile games, ensuring fewer compatibility hiccups over time.
However, LDPlayer isn't flawless—occasional stutters or crashes can disrupt sessions, and support for niche Android apps remains inconsistent. While it excels as a gaming-focused tool, developers targeting broader app testing might need additional solutions. For casual users prioritizing accessibility and performance on modest systems, LDPlayer strikes a practical balance.
How to Emulate Android Games on PC via LDPlayer?
To learn how to emulate Android games on PC, here's my streamlined approach using LDPlayer.
Step 1: Download The Official LDPlayer 9.0 Emulator
You will need to download the official Emulator from the official LDPlayer website. Complete the download and installation process by simply following the instructions. Once the installation process is complete, simply launch an Emulator instance of LDPlayer 9.0 straight from your PC.
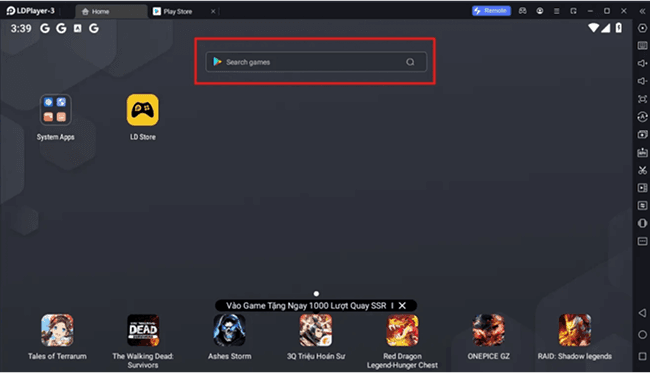
Step 2: Search and Install Games
Upon starting the emulator instance, to download games, simply search the name of the game you want to play in the search bar on the main screen and install the game by clicking the "Install" button. Please make sure that the application being installed is the correct version.
Step 3: Play Your Games
You will be redirected to the game's Google Play page. Simply log into your Google Play account and click on the "Install" button on the game's page in order to start the game downloading process. Once the application finishes downloading, you can launch the app directly from the home page of the Emulator instance after receiving a small notification notice.
#4 Phone Link
As an app developer exploring tools to emulate Android on pc, Microsoft's Phone Link stands out for its seamless device integration. Designed for Windows PCs, it bridges Android and iOS devices, letting you handle calls, view notifications, and mirror your phone's screen directly on your desktop. Pre-installed on Windows 10 and later, it pairs via Wi-Fi, Bluetooth, or cellular data, leveraging the "Link to Windows" service.
While screen mirroring works smoothly on supported devices like Samsung or HONOR, I've noticed occasional lag and blurry visuals during gaming sessions. Transferring files from PC to Android apps isn't straightforward, but quick access to installed apps and SMS management proves handy in emergencies. Though limited to select models, Phone Link simplifies basic cross-device tasks without requiring heavy emulation setups—ideal for users prioritizing convenience over full Android functionality.
How to Emulate Android on Windows with Phone Link?
Can't wait to know how to emulate Android on Windows with Phone Link, let me show you how next!
Step 1. Download and install the Phone Link app
Download and install the Phone Link app on your Windows PC and your Android device. It is usually preinstalled on Windows PCs, but if it's missing, you can get it from the Microsoft Store. Similarly, on Samsung cell phones, the app is often preinstalled, but other Android users can manually download the Link to Windows application from the Google Play Store.
Step 2. Launch and Pair
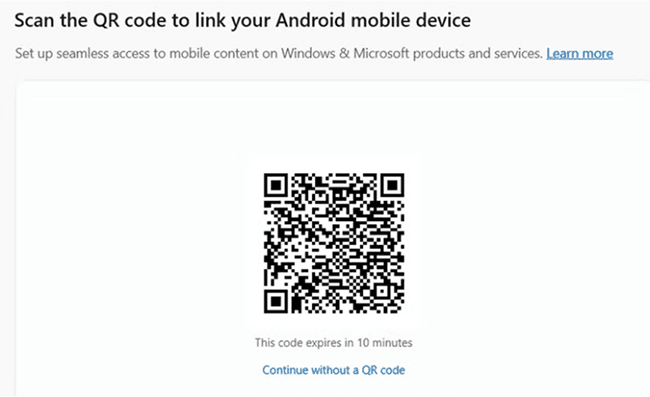
Next, launch the Phone Link on your Windows machine and follow the instructions to pair it with your Android device. To finish pairing, you might need to type a code or scan a QR code. Once paired, you can use your PC to view and respond to texts, access your phone's photos, and make and receive calls.
Notice: Some Samsung and HONOR devices also support screen mirroring through Phone Link, enabling you to control your phone directly from your PC.
#5 BlueStacks
I'm also an experienced gamer, and BlueStacks has been my go-to solution for how to emulate Android games on pc with console-like quality! Designed for high-performance gaming, it handles demanding titles like Genshin Impact and Call of Duty: Mobile effortlessly, delivering up to 120 FPS for buttery-smooth visuals. The customizable keymapping lets me bind controls to my keyboard, mouse, or gamepad, turning complex touch inputs into precise actions.
While it excels for AAA mobile games, everyday apps run less smoothly, and its hardware demands, like 4GB RAM minimum, can strain older PCs. Free users also face occasional ads, nudging enthusiasts toward its premium ad-free tier. If you're serious about gaming on a larger screen and own mid-to-high-end hardware, BlueStacks redefines mobile gaming immersion. Just don't expect it to double as a lightweight multitasking tool—it's built purely for play.
How to Emulate Android Apps on PC/Mac by BlueStacks?
To master how to emulate Android apps on the PC, BlueStacks offers a straightforward process.
Step 1. Install BlueStacks on your PC.
Step 2. Sign in to the Google Play Store or do it later.
Step 3. Look for the game in the search bar.
Step 4. Click on the search result to install the game.
Step 5. Complete Google sign-in (if you skipped step 2) to install the game.
Step 6. Start playing.
#6 Genymotion
As an app developer, I rely on Genymotion when I need a professional-grade Android emulator on my PC for deep system-level testing. Unlike consumer-focused tools, it prioritizes granular control over Android's architecture—simulating hardware sensors, tweaking kernel parameters, or replicating network conditions. While its core features are subscription-based, the free personal tier lets you explore core functionalities.
One caveat: Genymotion's system images lack Google Mobile Services by default, requiring manual installation of Play Store components via the "Open GApps" sideload option. This stripped-down approach is ideal for debugging OS interactions or testing app behavior under customized environments. However, if you're aiming for out-of-the-box app compatibility or casual use, pairing it with a user-friendly emulator like BlueStacks might save time.
For developers dissecting Android's inner workings, Genymotion is unmatched—just prepare for a steeper learning curve and extra setup steps.
How to Use Genymotion to Emulate Android on a Computer?
Want to know how to use Genymotion to emulate Android on a Computer? I'm going to show you next.
Step 1. Download and Install Genymotion
Browse the official website and select "Get Genymotion". Choose the "Free" version, then "Download". Review system requirements, then "Get Genymotion".
Step 2. Launch the Genymotion Setup Wizard
Double-click on the genymotion-2.4.0.exe file to launch the Genymotion Setup Wizard. Select the language to use during the installation: English. Install directory: E:\opt\Android\Genymotion. Review the selected installation options, then click "Install".
Step 3. Launch Genymotion
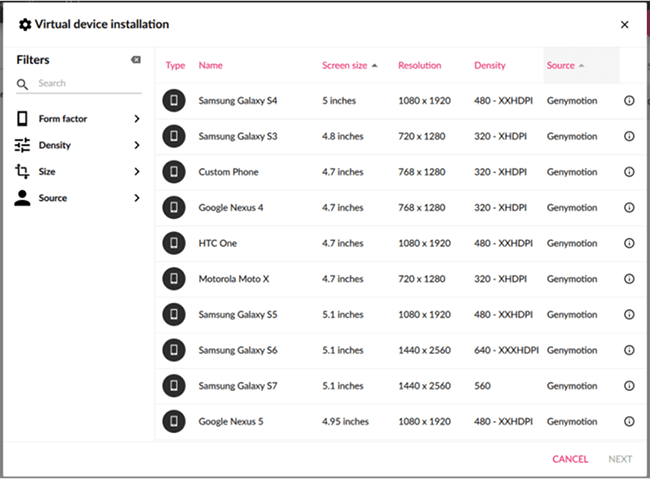
Add a Virtual Device. In order to access all available virtual devices, you need to sign in with your Genymotion account. Click "Sign in", then fill in your credentials. Select the virtual device you want to install, then click "Next". Review the virtual device properties before deployment. If OK, then click "Next". The files required by the virtual device will then be downloaded from the Genymotion servers. When the Virtual device creation wizard displays "The virtual device has been created successfully.", click "Finish".
Step 4. Start a Virtual Device
Select an installed virtual device, then click "Start".
Notice: the Android Virtual Device will be deployed as a VM inside Oracle VirtualBox. You may launch the Oracle VM VirtualBox Manager to review the VM settings, inspect the Storage configuration, etc.
How to Choose the Best Android Emulator on PC?
As an app developer evaluatingthe best Android emulator on pc, each tool serves distinct needs. Bit Cloud Phone shines for multi-account management and anonymity—ideal for marketers or e-commerce teams handling dozens of isolated profiles with unique IPs and anti-detect tech.
Android Studio suits developers needing granular OS testing, but overwhelms casual users. LDPlayer prioritizes gamers on low-spec PCs with 120 FPS optimization, though niche app support falters. Phone Link bridges basic phone-PC interactions but lacks advanced emulation. BlueStacks dominates gaming immersion but struggles with non-gaming apps and hardware demands.
Genymotion excels in system-level debugging but requires manual Play Store setup.
For versatility, Bit Cloud Phone balances security, affordability ($0.03/day), and native Android compatibility, perfect for scaling operations without cross-contamination risks. Gamers lean toward LDPlayer or BlueStacks, while developers prioritize Android Studio or Genymotion.
Yet if your workflow demands anonymity, multi-tasking, and enterprise-grade control, Bit Cloud Phone remains unmatched.
Pros
Cons
Rating
Bit Cloud Phone
•Simulate different types of Android phones for various users.
•Support native Google Play Store, providing a similar app experience, just like a physical device.
•Offer extensive real device parameters with customizable fingerprints and proxy IP addresses.
•Provide isolated environments to avoid account association.
•Equipped with advanced algorithms to provide smooth performance without delay.
•Suitable for cross-border e-commerce, marketing, advertising, and other cases that require high anonymity.
•Limited compatibility with large-scale mobile games is relatively.
4.8/5
Android Studio Emulator
•Simulate multiple Android devices to ensure compatibility with different environments.
•Boost your productivity with built-in tools like Jatpack Compose and an intelligent code editor.
•Stay ahead of the curve with Google's regular updates and support.
•No Google Play Store built-in.
•It can be demanding on system resources.
•Feature-rich but complex for a non-developer.
4.5/5
LDPlayer
•Provide stable gaming performance on low-end computers.
•Support high frame rates of up to 120 FPS, delivering smooth visuals.
•Allow precise control of CPU core, RAM allocation, and DPI to optimize system resource usage.
•Get updates every two weeks to support more mobile games.
•Occasional freezing and crashing happen.
•It may not be compatible with some relatively niche Android apps.
4.6/5
Phone Link
•High compatibility and requires no third-party tools, ready to use upon setup.
•Allows viewing phone notifications, making calls, sending/receiving texts, and controlling select mobile apps directly from a PC.
•Supports Wi-Fi, Bluetooth, and mobile data, adapting to diverse network environments without relying on a single connection type.
•No subscription fees and minimal resource consumption, ideal for basic cross-device needs.
•Limited iOS Compatibility: iOS devices only support basic features and lack app mirroring or file transfer capabilities.
•Only partial app mirroring is supported. Most apps cannot be directly operated on the PC.
•Lacks advanced interactions like game streaming or multi-tasking split-screen, positioning it as a basic tool rather than a comprehensive solution.
4.3/5
BlueStacks
•High FPS support ensures a smooth game screen without stuttering.
•Support multiple input devices such as keyboards, mice, and controllers for a good operational experience.
•Cover the most popular Android games, including MOBA, FPS, RPG, and more.
•Allow for the customization of keyboard mapping, resolution, etc, for your needs.
•No support for daily-use applications.
•Require high hardware requirements, which are not ideal for low-end PCs.
•Include ads in the free version.
4.5/5
Genymotion
•Great for developers
•Scaling options for businesses
•Free plan
•No ads
•Most features are paid
•Not great for gamers
4.6/5
Conclusion
To master how to emulate Android on PC, the six methods outlined cater to diverse needs. Bit Cloud Phone excels for marketers and developers managing multiple accounts securely, while Android Studio suits coders requiring deep OS customization. Gamers with budget hardware will prefer LDPlayer's optimized performance, whereas casual users needing basic phone-PC sync can rely on Phone Link. BlueStacks dominates high-end gaming with console-like controls, and Genymotion serves engineers dissecting system-level behavior.
Each tool fills a niche: choose LDPlayer or BlueStacks for gaming, Android Studio/Genymotion for development, and Phone Link for simplicity.
For professionals prioritizing anonymity and efficiency,Bit Cloud Phoneremains unmatched. Its anti-detect tech isolates virtual devices with unique fingerprints and IPs, ideal for testing apps or running TikTok live streams across multiple accounts. At $0.03/day per environment, it's cost-effective for scaling operations without compromising performance.
Whether simulating regional restrictions or managing 20+ storefronts, Bit Cloud Phone ensures seamless, secure Android emulation, making it the top pick for developers and marketers aiming to master how to emulate Android on pc with precision.
 2025.05.15 15:54
 BitBrowser