[4 Proven Ways] How to Set Proxy in Chrome Browser Easily
 2025.06.07 14:37
 BitBrowser
When you want to set a proxy but don't know how exactly to do it? When you want to change the proxy but can't find the proxy address? Or struggling with complicated proxy setups? Don't worry. We'll guide you through 4 simple methods to configure Chrome proxy settings effortlessly. One method, praised by brand protection analysts, market researchers, and privacy-focused professionals, even integrates magic proxies for secure browsing.
Whether you prefer system-level adjustments, CLI commands, extensions like FoxyProxy, or advanced browser tools. We've got you covered. Discover how to optimize your Chrome experience while protecting your digital footprint. Keep reading to master proxy configurations tailored for anonymity, security, and speed.
What is a Proxy and Why Use One?
A proxy acts as an intermediary between your device and the internet, masking your real IP address and location. It's commonly used to scrape data anonymously, enhance privacy, evade network filters, or access geo-restricted content. A proxy website browser routes your traffic through remote servers, letting you browse securely or test region-specific features.
Market researchers use proxy browsers to collect competitor pricing data without detection. Brand protection analysts monitor global trademark violations, while SEO specialists track localized search rankings. Privacy advocates rely on proxy browsers to avoid tracking and maintain anonymity during sensitive tasks.
BitBrowser: Best Privacy Tool for Chrome Proxy Settings
Looking for a browser trusted by privacy-focused professionals? Meet BitBrowser! It focuses on IP isolation to keep your online activities anonymous. Unlike basic proxy website browsers, BitBrowser supports magic proxies and protocols like HTTP, ensuring seamless switching between IPs. Its browser privacy features block trackers, prevent data leaks, and let you simulate diverse devices/locations—perfect for tasks demanding strict anonymity.
BitBrowser is ideal for brand protection analysts (monitoring counterfeit sites), market researchers (scraping competitor data), financial traders (managing multiple accounts), and email marketers (avoiding spam filters). It adapts to high-stakes workflows requiring stealth and precision.
BitBrowser: Set Proxy in Chrome Browser with Great Features!
BitBrowser assists you in browsing the internet privately with these key features:
•Dedicated IPs: Brand analysts assign unique IPs per tab to beat geo-blocks and avoid detection while monitoring counterfeit sites.
•Cross-Platform Support: Access Shopify, Instagram, or niche forums seamlessly—no site restrictions.
•Synchronized Windows: Market researchers juggle multiple accounts across synchronized tabs, tracking trends without manual input.
•Team Collaboration: Agencies share account access with controlled permissions, eliminating login chaos during campaigns.
•Encrypted Logins: Email marketers save credentials securely, skipping repetitive logins during bulk outreach.
•One-Click Proxies: New users set up proxies in minutes—ideal for freelancers managing client accounts risk-free.
•Bit Cloud Phone: Making you operate accounts between computers and phones easily.
Set Proxy in Chrome Browser Securely via BitBrowser
Ready to configure Chrome proxy server settings with BitBrowser? Follow these steps:
Step 1: Install BitBrowser and create a new profile. Navigate to the 'Proxy Settings' section.
Step 2: Choose your proxy type and input your IP, port, username, and password.
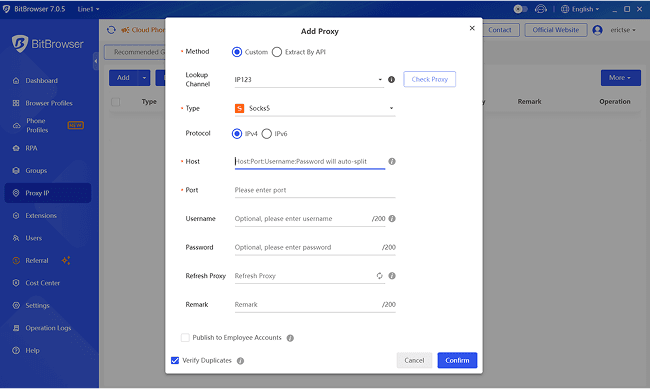
Step 3: Enable 'IP Isolation' to assign unique proxies per tab, avoiding IP bans during multi-account tasks.
Step 4: Save settings and launch the profile. BitBrowser automatically routes Chrome traffic through your chosen proxy server.
Step 5: Verify connectivity by visiting a site like "whatismyipaddress.com"—your proxy IP should display instantly.
2. Change Chrome Browser Proxy Settings via System Settings
Prefer manual control? Adjusting Chrome proxy settings via system settings suits casual users needing quick fixes, corporate networks enforcing unified configurations, or travelers temporarily avoiding regional blocks.
Unlike specialized tools, this method requires no extra software—ideal for one-time access to restricted content or basic privacy needs. Below, we'll break down step-by-step guides for desktop and mobile setups. Keep scrolling to configure your proxy in minutes!
[Website] Set Browser Proxy in Chrome
Adjust Chrome Proxy Settings via System Settings (Desktop):
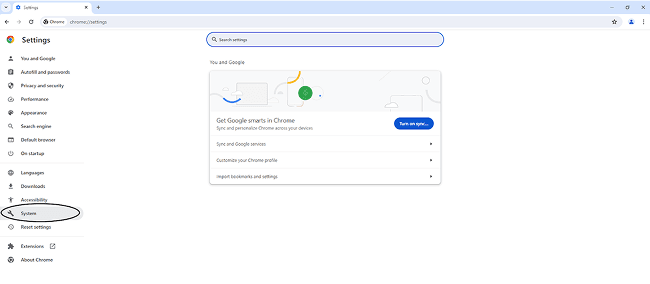
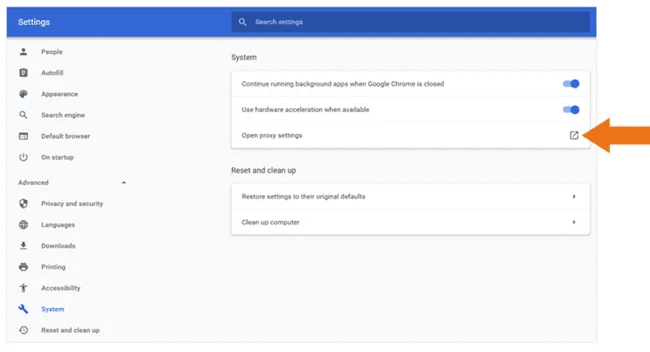
Step 1: Open Chrome, click the three-dot menu > Settings > System > Open your computer's proxy settings.
Step 2 (Windows): In Windows Settings, go to Network & Internet > 'Proxy'. Toggle 'Use a proxy server', enter your proxy IP and port.
Step 2 (Mac): In System Settings, select Network > your active connection > Details > 'Proxies'. Check Web Proxy (HTTP) and input your proxy details.
Step 3: Save changes. Chrome will now route traffic through your configured proxy.
Step 4: Test by visiting a proxy-check site (whatismyipaddress.com). If the IP matches your proxy, the setup is successful.
[Mobile] Set Browser Proxy in Chrome
Step 1 (Android):
Open Settings > Wi-Fi > long-press your connected network. Tap Modify Network > Advanced Options > Proxy > 'Manual'. Enter proxy IP and port.
Step 1 (iOS):
Go to Settings > Wi-Fi > tap the ⓘ icon next to your network. Scroll to Configure Proxy > 'Manual'. Input proxy details.
Step 2: Save changes. Chrome on mobile will now use the proxy for all browsing.
Step 3: Verify by visiting a site like 'ipleak.net'. If the displayed IP matches your proxy, the setup works.
How to Disable Proxy Settings in Chrome
Need to disable proxy settings? Temporary proxies may slow speeds or block sites. Here's how to turn them off:
Step 1 (Windows):
Go to 'Settings' > Network & Internet > 'Proxy'. Toggle off 'Use a proxy server'.
Step 1 (Mac):
Open 'System Settings' > Network > your connection > Details > 'Proxies'. Uncheck all proxy types.
Step 1 (Mobile):
Repeat the setup steps but select None (iOS) or Proxy > None (Android) under proxy configuration.
Step 2: Restart Chrome. Visit whatismyipaddress.com to confirm your original IP is visible.
3. Change Chrome Proxy Settings via Command-Line Flags
This method suits developers, IT admins, or power users automating Chrome proxy server configurations. Command-line flags let you launch Chrome with predefined proxy rules—ideal for scripting, testing multiple proxies, or enforcing network policies across devices.
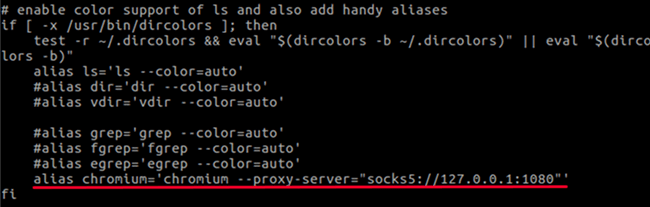
Step 1: Close all Chrome instances. Open Terminal (Mac/Linux) or Command Prompt (Windows).
Step 2:
Enter: chrome.exe --proxy-server='http://your-proxy-ip:port'
(Replace
chrome.exe with google-chrome on Linux/Mac.)Step 3: Launch Chrome. All traffic now routes through your proxy.
Step 4: Verify by checking your IP on sites like "ipleak.net.".
4. Extensions - Set Proxy in Chrome Browser via FoxyProxy
FoxyProxy is a browser extension that simplifies proxy configuration directly within Chrome, ideal for users needing frequent proxy switches. Unlike system-wide proxies, it applies settings only to the browser, preserving other apps' connectivity. Pros include granular URL-based rules, multi-proxy support, and one-click switching. However, it requires manual proxy input (no built-in proxies) and may overwhelm beginners with advanced options.
STEP 1: Visit the Chrome Web Store and add 'FoxyProxy Standard'.
STEP 2: Add a Proxy
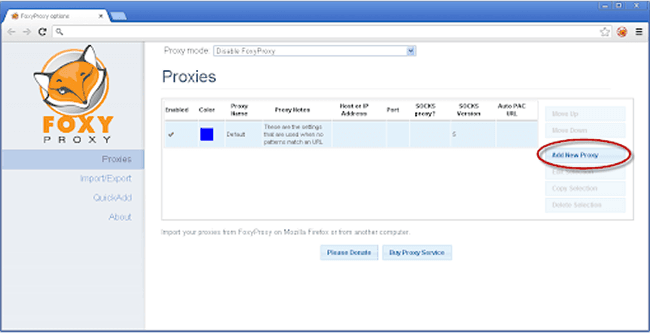
Click the FoxyProxy icon > Options > 'Add New Proxy'. Under 'Proxy Details', enter your proxy IP, port (e.g.,
7777 for HTTP), and authentication if required.STEP 3: Configure Rules (Optional)
Navigate to URL Patterns to set rules for auto-switching proxies.
STEP 4: Activate the Proxy
Click the FoxyProxy icon and select Use Proxy nsocks for All URLs to enable global routing.
STEP 5: Verify Connectivity
Visit a site like ipleak.net to confirm the proxy IP matches your setup.
FAQs About Setting Proxy in Chrome Browser
How Do I Know If My Proxy is Working?
Visit a site like "whatismyipaddress.com" or "ipleak.net." If the displayed IP matches your proxy server's address, it's working. If not, check your proxy settings for typos or test with a different proxy. Some sites may block proxy traffic—try accessing a geo-restricted page (e.g., a region-locked video) to confirm functionality.
How to Check Proxy and Firewall Settings in Chrome?
Go to Chrome's Settings > System > Open proxy settings to view or modify configurations. For firewall checks, access your OS settings (Windows: Control Panel > Firewall; Mac: System Settings > Network > Firewall). Enable proxies by entering valid IP/port details; disable them by toggling off the proxy option or selecting 'Direct connection.'
Conclusion
Configuring Chrome proxy settings unlocks secure browsing, and this guide simplifies it with four methods. Casual users can adjust system settings for quick fixes, while developers automate via command-line flags. Extensions like FoxyProxy offer flexible switching, but BitBrowser emerges as the top proxy website browser for professionals. It combines dedicated IPs, cross-platform support, and encrypted logins—perfect for brand analysts avoiding IP bans or marketers managing multiple accounts.
Unlike basic tools, BitBrowser ensures fingerprint masking and team collaboration without complex setups. Ready to enhance privacy and efficiency? Choose BitBrowser for seamless proxy management, whether scraping data, bypassing geo-blocks, or safeguarding sensitive tasks. Start your risk-free trial today!
 Multi-Account Management
 Prevent Account Association
 Multi-Employee Management
Recommended
See More ![]()