How to Set Up an MCP Server: Step-by-Step Guide (2025 Edition)
 2025.10.24 04:59
 petro
petroIn just one year, the Model Context Protocol (MCP) has evolved from a technical concept into a practical standard for connecting large language models (LLMs) with real-world tools and data.
With MCP, AI agents can understand context, make decisions, and perform complex tasks — not just reply with text.
This guide will walk you through setting up the Decodo MCP Server and connecting it to tools like Cursor, VS Code, and Claude Desktop. Once configured, you can automate web scraping, data collection, and more.
What Is an MCP Server?
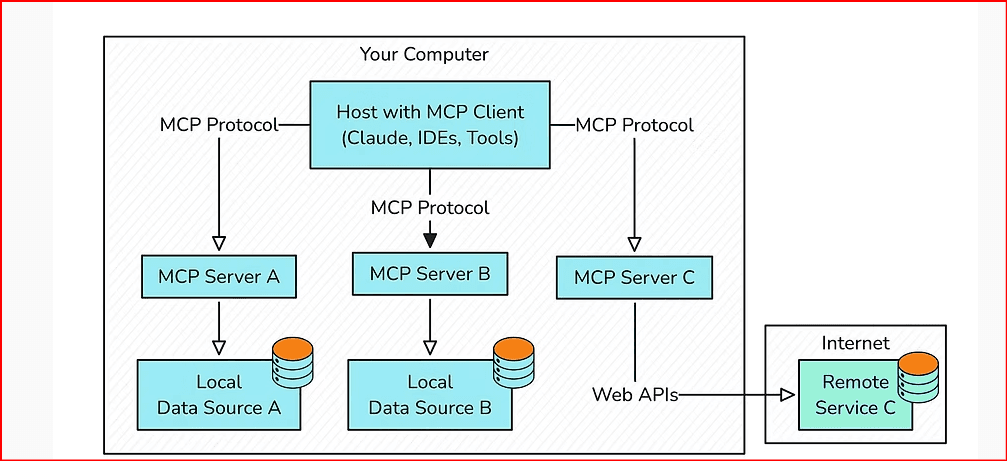
The Model Context Protocol (MCP) is an open standard that lets AI models communicate with external systems and applications.
Why it matters:
- No need for one-off integrations.
- Smarter automation and consistent performance.
The MCP server acts as a bridge between your AI client (like Claude or Cursor) and real-world tools. It:
- Listens for requests
- Executes tasks using connected tools
- Returns results to your AI client
You can run the server locally (recommended) or remotely.

Prerequisites
Before starting, make sure you have:
✅ Node.js 18+
✅ macOS or Windows
✅ Decodo Web Scraping API credentials
✅ MCP client (Cursor, Claude Desktop, VS Code)
Check Node.js:
node -v
npx -v
If both return a version number, you’re ready
Step 1 – Get Your Decodo or any providers API Credentials
1️⃣ Create a Decodo account and start a trial of the Web Scraping API Advanced Plan.
2️⃣ Go to your dashboard.
3️⃣ Copy your username and password and store them safely.
Step 2 – Download the Decodo MCP Server
Run in terminal:
git clone https://github.com/Decodo/decodo-mcp-server
This creates a folder called decodo-mcp-server.
Step 3 – Install & Build the Server
cd decodo-mcp-server
npm install
npm run build
? After building, locate index.js in the build folder:
cd build
pwd
Note the full path for later.
Step 4 – Configure the MCP Server
Create mcp.json and add:
{
  "mcpServers": {
    "decodo-mcp": {
      "command": "node",
      "args": ["/Users/your-user/projects/decodo-mcp/build/index.js"],
      "env": {
        "SCRAPER_API_USERNAME": "your_username",
        "SCRAPER_API_PASSWORD": "your_password"
      }
    }
  }
}
✅ Make sure the path matches your index.js.
Step 5 – Connect Your Client
Option 1 – VS Code + Smithery
- Log in to Smithery with GitHub.
- Install with:
npx -y @smithery/cli@latest install @Decodo/decodo-mcp-server --client vscode --profile <smithery_profile> --key <smithery_key>
Option 2 – Cursor
- Open Settings → Tools & Integrations → New MCP Server
- Paste your JSON config
- Restart Cursor
- Green = success
Option 3 – Claude Desktop
- Open Settings → Developer → Edit Config
- Add MCP config to
mcpServers - File paths:
- Windows:
%APPDATA%/Claude/claude_desktop_config.json - macOS:
~/Library/Application Support/Claude/claude_desktop_config.json - Linux:
~/.config/Claude/claude_desktop_config.json
- Windows:
- Save → Quit → Restart
Built-In Decodo MCP Tools
- scrape_as_markdown → Clean web scraping in Markdown
- google_search_parsed → Structured Google search results
- amazon_search_parsed → Parse Amazon product data
Why Decodo MCP?
- Supports JavaScript-heavy sites
- Uses 125M+ rotating IPs across 195 countries
- Built-in error handling, retries, and throttling
- Works on macOS, Windows, Linux
Troubleshooting
- ✅ Node.js v18+ installed
- ✅ Ran
npm install+npm run build - ✅ Credentials match dashboard
- ✅ File path correct
- ✅ Restart client after changes
Final Thoughts
With Decodo MCP, your AI assistant is no longer just a chatbot — it’s a task-performing engine. Ask it to fetch, scrape, or automate without writing code.
Enterprise-grade automation, directly in your favorite AI tools — all thanks to MCP.
 Multi-Account Management
 Prevent Account Association
 Multi-Employee Management
Recommended
See More ![]()