How to Detect and Prevent DNS Information Leaks in 2026
 2026.06.27 19:48
 petro
petroDNS is one of the most important parts of internet connectivity, but it is also one of the most overlooked privacy risks.
Every time a user visits a website, the device usually needs to translate the domain name into an IP address. This process is handled through DNS, or Domain Name System. Without DNS, users would need to remember numerical IP addresses instead of simple domain names.
The problem is that DNS requests can reveal a lot about online activity. Even when the main website connection is encrypted with HTTPS, DNS queries may still expose which domains a user is trying to access. This becomes especially important when someone uses a VPN, proxy, mobile proxy, antidetect browser, remote workspace, or privacy-focused browser setup.
A DNS information leak happens when DNS requests are sent outside the expected secure route. For example, a user may connect to a VPN, but the device still sends DNS requests to the internet service provider. A proxy may hide the visible IP address, but DNS resolution may still happen locally. A browser may use its own secure DNS settings that conflict with the system, VPN, or proxy configuration.
What Is a DNS Information Leak?
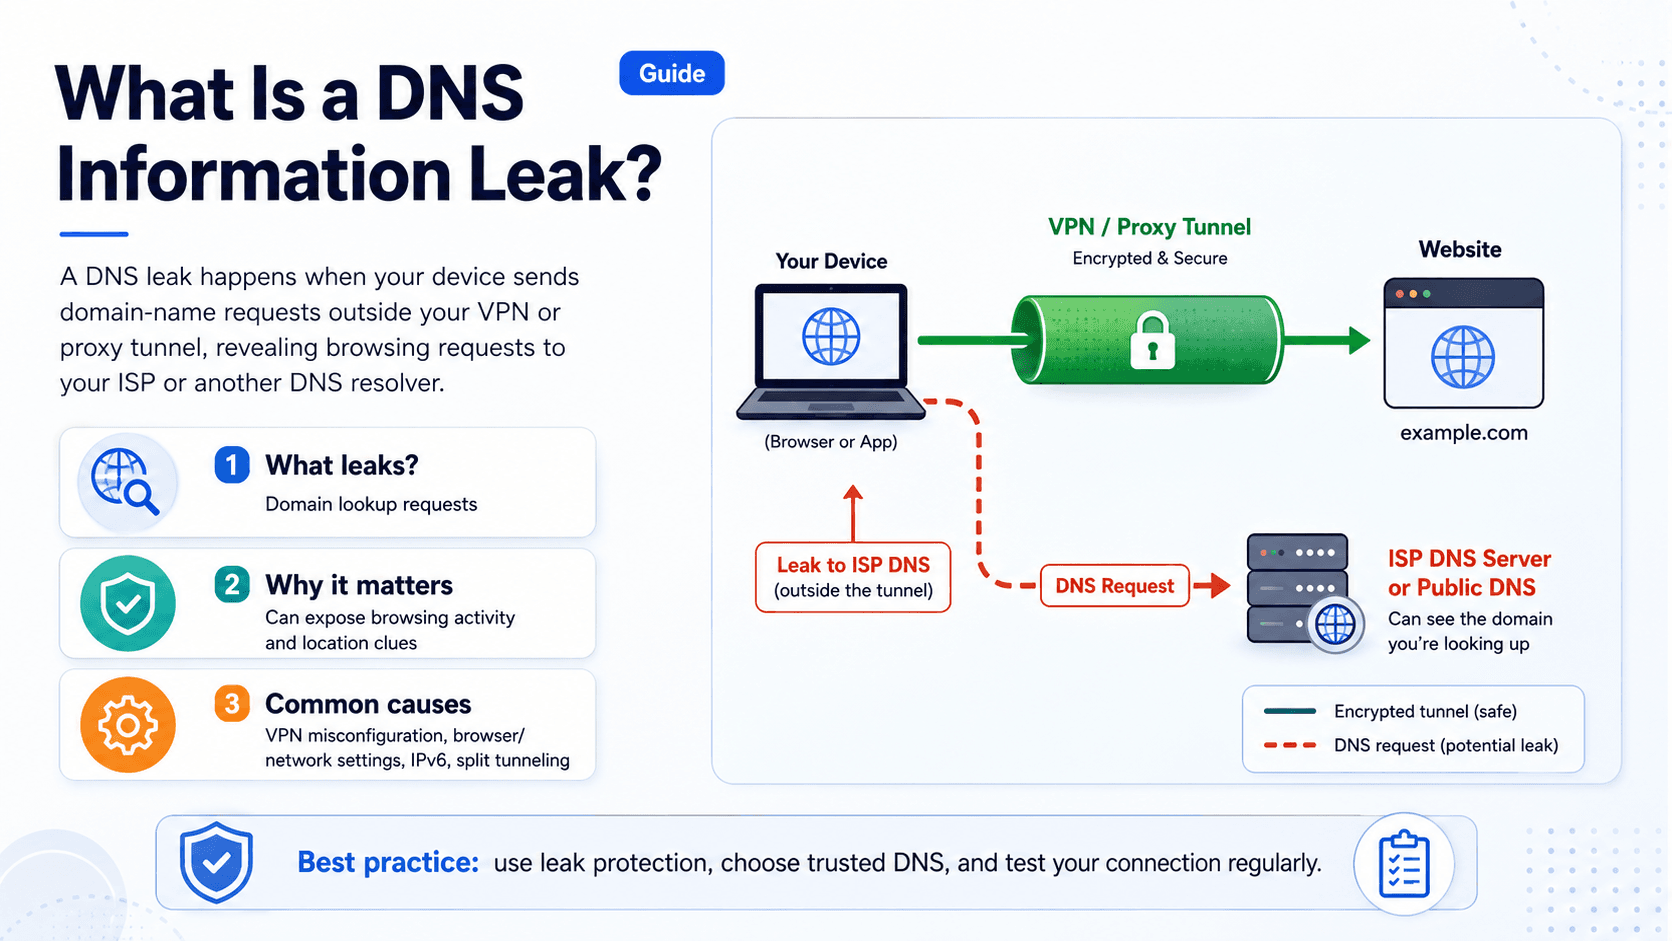
A DNS information leak occurs when domain lookup requests are exposed to an unintended DNS resolver.
In simple terms, your device asks, “Where is this website located?” A DNS resolver answers with the IP address. If that question is sent to the wrong resolver, your browsing activity may be visible to the wrong network, ISP, organization, or third-party service.
For example, imagine a user connects to a VPN. The public IP address changes, and websites now see the VPN server instead of the user’s original connection. However, if DNS requests still go to the user’s local ISP, the ISP may still see the domains being requested. That is a DNS leak.
Why DNS Leaks Matter in 2026
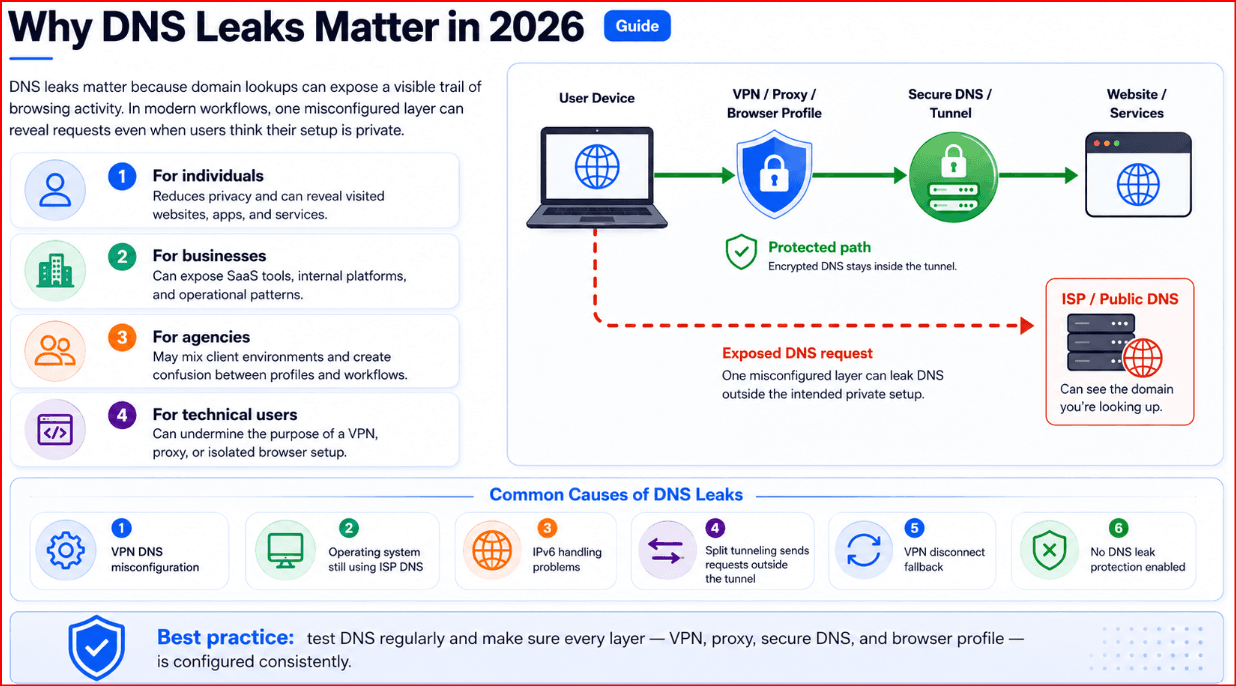
DNS leaks are important because domain lookups create a visible trail of browsing behavior.
A DNS leak may reveal:
- Websites visited
- Apps and services being contacted
- SaaS platforms used by a company
- Internal tools accessed by employees
- Research activity
- Account-management platforms
- Competitor analysis targets
- Proxy or VPN misconfiguration
- Browser profile misalignment
For individuals, this can reduce privacy. For businesses, it can expose operational patterns. For agencies, it can create confusion between client environments. For technical users, it can break the purpose of a VPN, proxy, or isolated browser setup.
DNS leaks are especially relevant in 2026 because online workflows are more complex. Users may combine VPNs, proxies, secure DNS, browser profiles, mobile networks, cloud workspaces, and automation tools. Each layer may handle DNS differently. If one layer is misconfigured, the user may believe the connection is private while DNS requests are still exposed.
Common Causes of DNS Leaks
1. VPN DNS Misconfiguration
A VPN should usually route both traffic and DNS requests through its own encrypted tunnel. But not every VPN configuration handles DNS correctly.
A leak may happen when:
- The VPN does not force DNS through the tunnel.
- The operating system keeps using the ISP DNS resolver.
- IPv6 traffic is not properly handled.
- The VPN disconnects briefly and DNS falls back to the local network.
- Split tunneling sends some traffic outside the VPN.
- The VPN app lacks DNS leak protection.
This is one of the most common DNS leak scenarios.
2. Proxy DNS Leaks
Many users assume that a proxy automatically protects DNS requests. That is not always true.
A proxy may route web traffic through another IP address, but DNS resolution can still happen locally depending on the application, browser, proxy protocol, and configuration.
This is especially important for SOCKS proxies. Some configurations resolve hostnames on the local device, while others resolve them through the proxy server. If DNS is resolved locally, the user’s ISP or local DNS provider may still see the requested domains.
For proxy users, it is not enough to check only the visible IP address. DNS behavior must also be tested.
3. Browser-Level Secure DNS Conflicts
Modern browsers often include secure DNS features, such as DNS over HTTPS. This can improve privacy, but it can also create conflicts when combined with VPNs, proxies, enterprise policies, or custom DNS rules.
For example, the operating system may use one DNS provider, the VPN may assign another, and the browser may use its own secure DNS provider. If these layers are not aligned, DNS requests may not follow the expected route.
This does not always mean the setup is insecure, but it can create inconsistency. For privacy-focused or account-management workflows, inconsistency is a problem.
4. IPv6 Leaks
Some VPNs and proxies handle IPv4 correctly but fail to control IPv6 traffic. If the local network supports IPv6 and the VPN or proxy does not manage it properly, DNS or connection data may leak through IPv6.
Users often test only IPv4 because most tools display the visible IP address. However, IPv6 can reveal additional network information if not properly configured.
A complete leak test should check both IPv4 and IPv6 behavior.
5. Operating System Fallback Behavior
Operating systems may fall back to available DNS resolvers when the preferred resolver fails. This can be useful for connectivity, but it can also create privacy issues.
For example, if encrypted DNS fails, the system or browser may try a standard unencrypted resolver. This fallback may keep websites loading, but it may also expose DNS requests outside the intended secure route.
Users who need strict DNS privacy should avoid silent fallback where possible and choose configurations that fail closed instead of falling back to insecure resolution.
6. Public Wi-Fi and Captive Portals
Public Wi-Fi networks often interfere with DNS to redirect users to login pages. Hotels, airports, cafés, schools, and public networks may use captive portals that depend on DNS manipulation.
This can temporarily break secure DNS, VPN connections, or proxy routing. Users may see inconsistent results before and after logging into the network.
Public Wi-Fi is one of the most common environments where DNS behavior becomes unpredictable.
How to Detect DNS Information Leaks
Step 1: Check Your Expected DNS Resolver
Before testing, identify what DNS resolver you expect to see.
For example:
- If using a VPN, DNS should usually show the VPN provider’s DNS servers.
- If using a custom secure DNS provider, results should match that provider.
- If using a corporate network, results may show company-managed DNS.
- If using a proxy-only setup, DNS behavior depends on proxy type and browser configuration.
Testing is only useful if you know what the correct result should look like.
Step 2: Run a DNS Leak Test
Use a DNS leak test website after connecting to your VPN, proxy, or secure browser setup.
A DNS leak test usually shows:
- Detected DNS resolver
- Resolver IP address
- Resolver location
- Resolver owner or provider
- Possible IPv6 exposure
- Sometimes WebRTC or IP-related warnings
If the result shows your ISP or local network DNS while you expected VPN or secure DNS routing, you likely have a DNS leak.
Step 3: Compare Results Before and After Connection
A good method is to run the same test twice:
- First, test without VPN or proxy.
- Then connect to the VPN, proxy, or secure browser profile and test again.
If the DNS provider stays the same after connecting to the VPN, that may indicate DNS requests are not being routed through the VPN.
If the DNS provider changes to the VPN or selected secure DNS provider, the setup is more likely to be working correctly.
Step 4: Test Multiple Browsers
DNS behavior can differ between browsers. Chrome, Firefox, Edge, Brave, and other Chromium-based browsers may use different secure DNS settings depending on configuration.
Test in:
- Your main browser
- A secondary browser
- A private/incognito window
- A browser profile used for work
- A browser profile used with a proxy or VPN
This helps identify whether the issue is system-wide or browser-specific.
Step 5: Test IPv6
A complete DNS leak check should include IPv6.
If your VPN or proxy does not support IPv6 properly, you may need to:
- Disable IPv6 at the system level.
- Use a VPN that supports IPv6 leak protection.
- Configure firewall rules.
- Use a secure DNS provider that handles IPv6 correctly.
- Test again after every change.
IPv6 leaks are easy to miss because many users focus only on the main visible IPv4 address.
Step 6: Test After Reconnects and Network Changes
DNS leaks may not appear during the first test. They can happen after:
- VPN reconnects
- Wi-Fi changes
- Sleep/wake cycles
- Proxy rotation
- Network switching
- Browser restart
- System updates
- DNS cache resets
For serious privacy or business workflows, test DNS behavior after real-world events, not only after a fresh connection.
How to Prevent DNS Information Leaks
1. Use a VPN With DNS Leak Protection
A reliable VPN should include DNS leak protection. This means DNS requests are forced through the encrypted VPN tunnel instead of being sent to the local ISP.
Look for VPN features such as:
- DNS leak protection
- Kill switch
- IPv6 leak protection
- No local DNS fallback
- Custom DNS support
- Split tunneling controls
- Clear DNS routing documentation
A kill switch is especially important. If the VPN disconnects, the kill switch can block traffic instead of allowing the device to fall back to the normal connection.
2. Enable Secure DNS Carefully
Secure DNS technologies such as DNS over HTTPS and DNS over TLS can encrypt DNS traffic between the device and the resolver.
This can reduce exposure on public Wi-Fi, local networks, and ISP-level monitoring. However, secure DNS should be configured carefully.
The goal is consistency. Your browser, operating system, VPN, and proxy setup should not fight each other.
For example, if your VPN already manages DNS, forcing the browser to use a different external secure DNS provider may bypass the VPN’s DNS design. In some cases, this may be acceptable. In others, it may create a privacy or policy problem.
For strict setups, choose one DNS strategy and apply it consistently.
3. Disable Browser DNS Fallback When Needed
Some browsers may fall back to unencrypted DNS if secure DNS fails. This improves reliability, but it may weaken privacy.
For high-security workflows, consider using a custom secure DNS provider in the browser instead of automatic mode. Custom secure DNS configurations may reduce automatic fallback, depending on the browser.
After changing this setting, test again to confirm that DNS requests are going where expected.
4. Configure Proxy DNS Correctly
Proxy users should pay close attention to where DNS resolution happens.
For SOCKS5 workflows, use configurations that resolve hostnames through the proxy rather than locally. Some applications and libraries require a specific setting or URL format to avoid local DNS resolution.
For browser-based proxy workflows, check whether the browser profile, extension, or proxy manager sends DNS requests through the proxy or through the system resolver.
A proxy that hides the IP address but leaks DNS locally is not a complete privacy setup.
5. Use Firewall Rules
Firewall rules can help prevent DNS traffic from escaping through unauthorized paths.
For example, advanced users can block outbound DNS traffic on port 53 except through approved interfaces or resolvers. This can prevent traditional DNS requests from leaving the device when they should be routed through a VPN or secure resolver.
Firewall-based protection is useful because it works below the browser level. Even if an application tries to send DNS traffic outside the intended route, the firewall can block it.
This is especially useful for business environments, servers, and privacy-focused workstations.
6. Control IPv6
If your VPN, proxy, or DNS provider does not properly support IPv6, either configure IPv6 correctly or disable it.
The best option is to use services that handle IPv6 securely. But if that is not possible, disabling IPv6 can prevent accidental leaks.
After changing IPv6 settings, test again. Do not assume the change worked without verification.
7. Clear DNS Cache After Configuration Changes
DNS results can be cached by:
- The operating system
- The browser
- The router
- The VPN client
- Local DNS software
- Security tools
After changing DNS settings, clear the DNS cache and restart the browser or network connection.
This helps ensure the next test shows the current configuration, not old cached results.
8. Avoid Unknown DNS Extensions and Proxy Extensions
Browser extensions can affect DNS, proxy routing, and traffic behavior. Some proxy extensions route traffic in ways that are not obvious to the user.
For professional workflows, avoid random proxy, VPN, or DNS extensions from unknown developers. Use trusted tools with clear documentation.
Extensions should be reviewed regularly, especially in browser profiles used for client work, SEO operations, advertising accounts, or secure research.
DNS Leaks in VPN, Proxy, and Antidetect Browser Workflows
DNS leak prevention is especially important for users who manage multiple browser environments.
Antidetect browsers, proxy profiles, and multi-account tools are often used to separate sessions, cookies, fingerprints, proxies, and account environments. But DNS behavior must also match the profile strategy.
If one browser profile uses a proxy from a specific region, but DNS requests resolve through the local ISP or a different country, the environment becomes inconsistent. This can create privacy issues and may also reduce the quality of the profile setup.
For professional browser-profile management, users should check:
- Proxy IP location
- DNS resolver location
- Browser timezone
- Browser language
- WebRTC behavior
- IPv6 behavior
- Secure DNS settings
- Profile-level proxy settings
- System-level DNS settings
The goal is not only privacy. The goal is consistency across the whole browser environment.
Where BitBrowser Fits Into DNS Leak Prevention
BitBrowser can help users organize browser profiles for different workflows, clients, accounts, or projects. Each profile can be configured with its own proxy and browser environment, which is useful for teams and professionals who need separation between different online operations.
For DNS leak prevention, BitBrowser should be used as part of a complete configuration strategy. Users should not only set a proxy and assume everything is protected. They should also test how DNS behaves inside each profile.
A professional BitBrowser workflow should include:
- Assigning the correct proxy to each profile
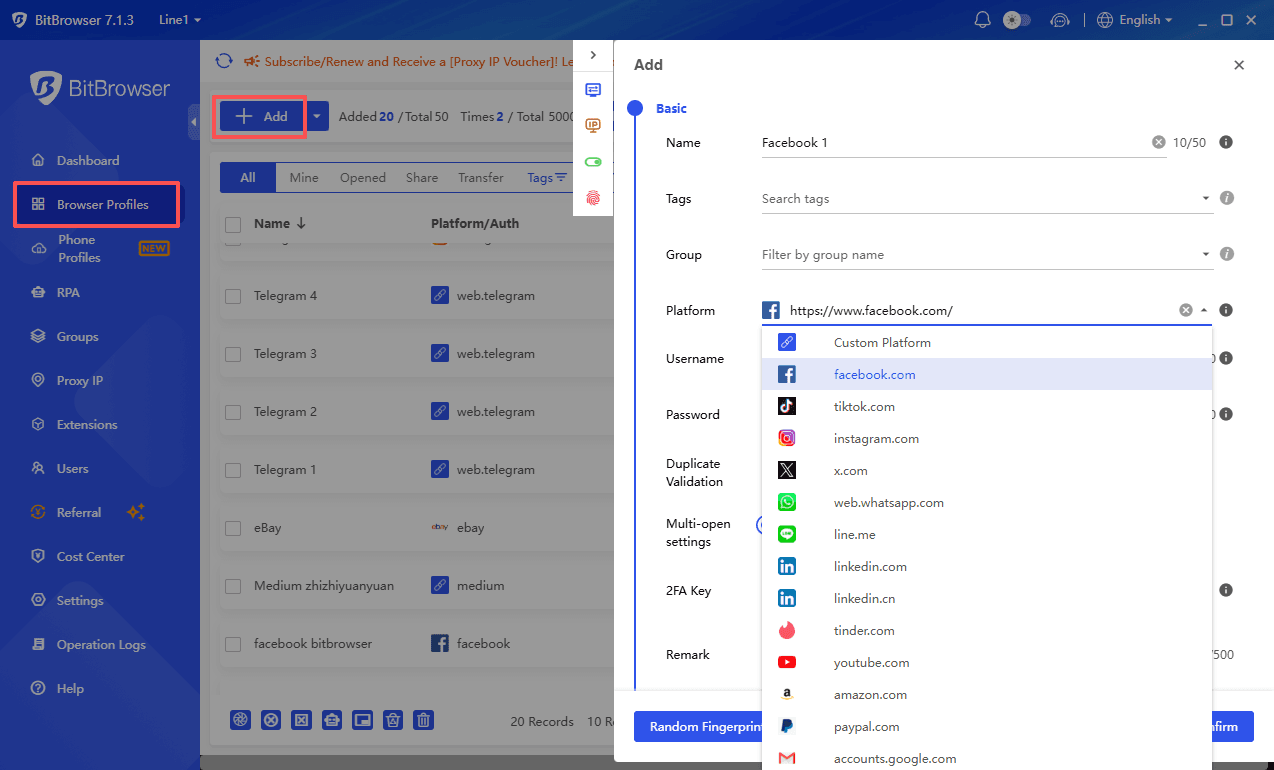
- Testing IP and DNS results inside the profile
- Checking WebRTC behavior
- Avoiding conflicting browser extensions
- Keeping browser settings consistent with the proxy region
- Testing after proxy changes or profile updates
- Separating client profiles from personal browsing
BitBrowser helps manage the browser environment, but DNS leak prevention still requires correct proxy, VPN, operating system, and secure DNS configuration.
Practical DNS Leak Prevention Checklist
Use this checklist before relying on any privacy or proxy setup:
- Connect to your VPN, proxy, or browser profile.
- Run an IP leak test.
- Run a DNS leak test.
- Check whether the DNS resolver matches your expected provider.
- Test IPv6.
- Test WebRTC exposure.
- Restart the browser and test again.
- Switch networks if needed and retest.
- Confirm browser secure DNS settings.
- Confirm system DNS settings.
- Check proxy DNS behavior.
- Enable VPN kill switch if using a VPN.
- Disable unsafe DNS fallback where needed.
- Remove unknown proxy or DNS extensions.
- Retest after every major update.
DNS privacy is not a one-time setup. It should be verified regularly.
Best Practices for Businesses and Agencies
Businesses should treat DNS leaks as part of operational security.
A company may use VPNs, proxies, cloud tools, remote workers, and browser profiles across multiple teams. Without a clear DNS policy, every employee may configure things differently.
A better approach is to define:
- Approved VPN providers
- Approved DNS resolvers
- Approved browser settings
- Proxy usage rules
- Testing procedures
- IPv6 policy
- Extension policy
- Profile management rules
- Offboarding process
- Incident response steps
For agencies, the same principle applies to client work. Each client environment should be separated, documented, and tested.
A DNS leak in a client workflow may expose research activity, dashboard access, or operational patterns. Even when it does not expose passwords or content, it can reveal metadata that should remain private.
Common DNS Leak Mistakes to Avoid
Mistake 1: Checking Only the IP Address
A changed IP address does not prove DNS is protected. Always check DNS separately.
Mistake 2: Trusting Browser Defaults
Browser defaults are designed for general users, not necessarily for strict privacy workflows. Review secure DNS settings manually.
Mistake 3: Ignoring IPv6
IPv6 leaks are common because users forget to test them.
Mistake 4: Mixing VPN, Proxy, and Secure DNS Without a Plan
More privacy tools do not always mean better privacy. Misconfigured layers can conflict with each other.
Mistake 5: Never Retesting
A setup that worked last month may fail after a browser update, VPN update, OS update, or proxy change.
Final Verdict
DNS information leaks are one of the most common hidden privacy problems in modern internet workflows. A user may believe their VPN, proxy, or browser profile is protecting them, while DNS requests still reveal domain activity to the wrong resolver.
In 2026, preventing DNS leaks requires more than installing a VPN or choosing a proxy. Users need to understand how DNS works across the operating system, browser, VPN, proxy, and secure DNS settings.
The best approach is simple:
- Know which DNS resolver should be used.
- Test DNS behavior regularly.
- Enable leak protection.
- Use secure DNS carefully.
- Control IPv6.
- Avoid conflicting browser settings.
- Keep each browser profile consistent.
For teams and professionals using BitBrowser, DNS testing should become part of every profile setup. A clean browser environment should include not only the right proxy and fingerprint settings, but also consistent DNS behavior.
A secure workflow is not built from one tool. It is built from correct configuration, regular testing, and disciplined account and browser environment management.

 Multi-Account Management
 Prevent Account Association
 Multi-Employee Management
Recommended
See More