How to Make Your Own VPN Server in 2026: Complete WireGuard Guide
 2026.07.29 22:54
 BitBrowser
A self-hosted VPN gives you direct control over the gateway, keys, firewall rules, and users. Instead of sharing an exit IP with a large commercial service, your devices connect to a server you administer and send selected or all internet traffic through an encrypted WireGuard tunnel. This is useful for securing public Wi-Fi, reaching a home or office network, and creating a consistent egress point for legitimate work.
Ubuntu 26.04 LTS is a current long-term-support server platform, while WireGuard uses a compact public-key configuration. The official BitBrowser comparison of VPNs and BitBrowser is worth reading before deployment: a VPN handles the network path and public IP, whereas BitBrowser separates browser profiles, cookies, storage, and browser-level identity. They solve different layers of the privacy problem.
Related BitBrowser reading: VPN vs BitBrowser | private browsing | network identity in 2026
1. Choose the server and plan the network
Use a small VPS with a public IPv4 address, a supported Ubuntu Server 26.04 LTS image, and enough monthly transfer for your expected traffic. The server should be located where you are legally permitted to operate it. Record the provider firewall, SSH access method, public IP, and network-interface name before changing anything.
This guide uses 10.8.0.0/24 for the VPN and UDP port 51820. Change the private subnet if it overlaps a home, office, container, or cloud network. Each client must receive a unique address, such as 10.8.0.2/32, 10.8.0.3/32, and so on.
VPN Deployment Plan
Item | Recommended value | Why it matters |
|---|---|---|
| Operating system | Ubuntu Server 26.04 LTS | Use a supported image and install updates first. |
| VPN protocol | WireGuard | Small configuration surface and modern public-key model. |
| Transport | UDP 51820 | Open this port in both the cloud firewall and UFW. |
| VPN subnet | 10.8.0.0/24 | Change it if it overlaps an existing local network. |
| Server address | 10.8.0.1/24 | The gateway address inside the encrypted tunnel. |
| First client | 10.8.0.2/32 | Give every peer a unique tunnel address. |
2. Update Ubuntu and install WireGuard
Connect with an SSH key, apply updates, and install WireGuard. The qrencode package is optional but useful when importing a client configuration into the WireGuard mobile application. Generate the server private key with restrictive permissions and never paste it into tickets, chat messages, or public repositories.
The public key may be shared with clients. The private key must remain on the server. For stronger operational separation, generate every client private key on that client rather than on the VPN server.
Command or configuration example
sudo apt update |
3. Enable forwarding and identify the public interface
A full-tunnel VPN must forward packets from wg0 to the server’s public interface. Enable IPv4 forwarding persistently, then inspect the default route. Replace eth0 in later examples with the actual interface shown by the command, which may be ens3, enp1s0, or another provider-specific name.
Forwarding alone is not enough: the server also needs firewall permission and source NAT so replies return through the correct path.
Command or configuration example
echo 'net.ipv4.ip_forward=1' | sudo tee /etc/sysctl.d/99-wireguard-forward.conf |
4. Create the WireGuard server configuration
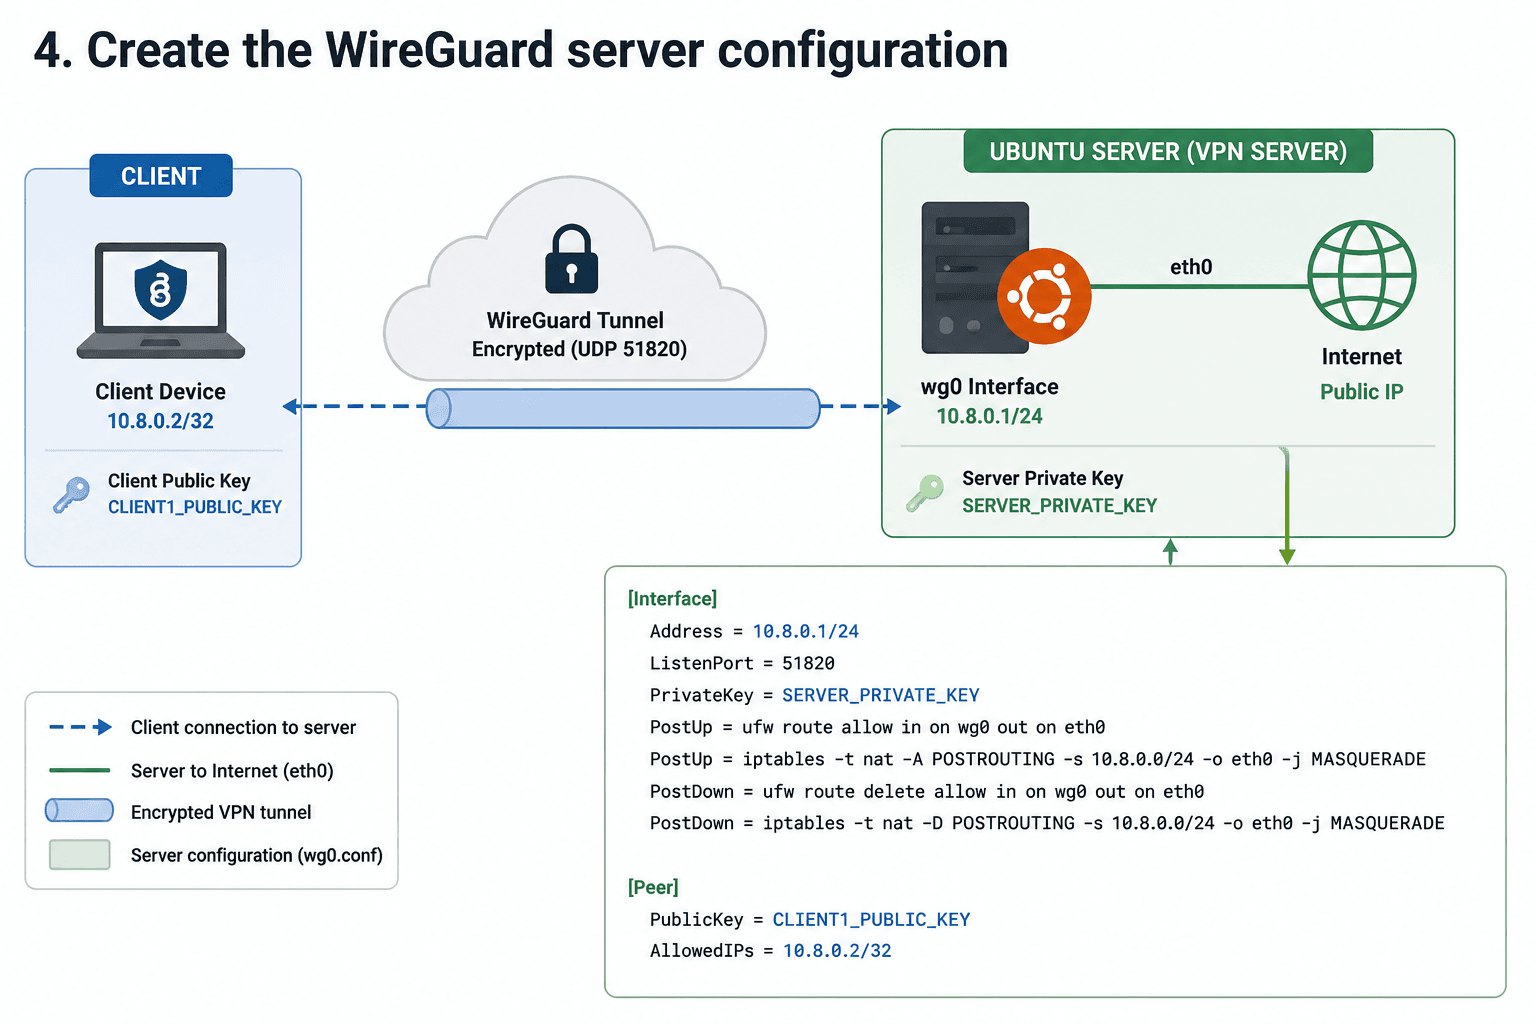
Create /etc/wireguard/wg0.conf and insert the server private key value. Add the first client public key only after generating it on the client. The PostUp and PostDown lines allow routed traffic and add or remove IPv4 masquerading when the interface starts or stops.
Use the narrowest AllowedIPs value for each server-side peer. A /32 ensures that one client cannot claim another client’s tunnel address. Do not reuse one client configuration across several devices; issue a separate key pair and address per device.
Command or configuration example
[Interface] |
5. Open the firewall and start the service
Allow SSH before enabling UFW so you do not lock yourself out. Open UDP 51820 in UFW and in the hosting provider’s external firewall or security group. Then secure the configuration file and enable the systemd service so WireGuard starts after reboot.
Running wg show should display the interface, listening port, server public key, and configured peers. A latest-handshake time appears only after a client successfully connects.
Command or configuration example
sudo ufw allow OpenSSH |
6. Generate a client key and create the profile
Install the WireGuard application or command-line tools on the client and generate the key pair locally. Copy only client1.pub to the server, place it in the [Peer] section, and restart or reload wg0. Keep client1.key on the client.
The client profile below sends all IPv4 traffic through the VPN. For a split tunnel, replace 0.0.0.0/0 with only the remote private networks you need. PersistentKeepalive is useful for phones and laptops behind NAT; it is normally set on the roaming peer, not on the public server.
Command or configuration example
umask 077 |
7. Test DNS, routing, and reconnection
Connect the client and verify that wg show on the server reports a recent handshake and increasing transfer counters. Confirm that the client can reach 10.8.0.1, browse normally, and shows the server’s public IP. Test again after switching between Wi-Fi and mobile data and after rebooting both systems.
A VPN can still leak traffic if the client routes only some destinations, ignores the configured DNS resolver, or prefers unconfigured IPv6. Decide whether you need IPv6, then configure it end to end or intentionally keep the article’s IPv4-only design.
Command or configuration example
sudo wg show |
8. Harden and maintain the VPN
Use SSH keys, disable password login only after confirming key access, install security updates, and keep the public attack surface limited to SSH and the WireGuard UDP port. Back up the configuration and public keys, but protect private keys carefully. To revoke a lost device, remove its peer from the server and reload WireGuard.
A self-hosted VPN shifts trust rather than eliminating it: the hosting provider can associate the server with your account, websites see the server IP, and authenticated services still know who signed in. BitBrowser can add authorized browser-profile isolation, but it does not replace tunnel encryption or server hardening. Use both tools only for lawful, permitted activity.
Troubleshooting Table
Symptom | Likely cause | What to check |
|---|---|---|
| No handshake | Wrong key, endpoint, port, or cloud firewall rule | Compare public keys; verify UDP 51820 and the server IP. |
| Handshake but no internet | Forwarding or NAT is missing | Check ip_forward, public interface name, UFW route, and MASQUERADE. |
| Some sites fail | MTU or IPv6 path issue | Test MTU 1380-1420; configure IPv6 fully or use IPv4-only routes. |
| DNS still uses local network | Client DNS is not applied | Set a trusted resolver and retest after reconnecting. |
| Connection dies on mobile data | NAT mapping expires | Keep PersistentKeepalive = 25 on roaming clients. |
| Server works until reboot | Service not enabled or rule not persistent | Enable wg-quick@wg0 and keep routing rules in wg0.conf. |
Frequently Asked Questions
Is a self-hosted VPN completely anonymous?
No. It hides traffic from the local network between the client and VPN server and changes the public egress IP. The VPS provider, destination services, account logins, cookies, and browser fingerprints can still identify or correlate activity.
Should I choose WireGuard or OpenVPN?
WireGuard is usually simpler and performs well for modern clients. OpenVPN remains useful when you need older-platform compatibility, TCP transport, or an existing certificate-based deployment.
How many clients can I add?
Add one peer, key pair, and unique tunnel address per device. Practical capacity depends on CPU, network throughput, latency, and provider transfer limits.
Do I need a domain name?
No. A static public IP is enough. A domain or dynamic-DNS name is helpful when the endpoint address may change.
Can BitBrowser replace this VPN server?
No. BitBrowser isolates browser profiles and related browser data; a VPN encrypts network traffic between a device and a VPN gateway. The two functions are complementary, not interchangeable.
Conclusion
Creating your own VPN server in 2026 is manageable when the design stays simple: one supported Ubuntu host, one WireGuard interface, explicit keys, a small private subnet, narrow firewall exposure, and one peer per device. The most common failures come from an incorrect public interface name, missing forwarding or NAT, blocked UDP traffic, and mismatched keys.
Keep the server patched, remove unused peers, test after every network change, and document who is authorized to connect. For browser-level separation, review the linked BitBrowser resources and keep VPN expectations realistic: the tunnel secures the path to your server, while privacy still depends on accounts, browser state, DNS, endpoint security, and responsible use.
Final Deployment Checklist
| Control | Required action |
|---|---|
| ☐ System updates applied | Run apt update/upgrade and confirm the host is on a supported Ubuntu release. |
| ☐ Recovery access confirmed | Test SSH-key access and keep the provider console available before firewall changes. |
| ☐ Only required ports open | Allow SSH as needed and UDP 51820; remove unrelated public services. |
| ☐ One identity per device | Assign a unique key pair and /32 tunnel address to every client. |
| ☐ Routing and DNS tested | Verify handshake, public IP, DNS resolver, split/full-tunnel behavior, and IPv6 expectations. |
| ☐ Reboot test completed | Restart server and client and confirm wg-quick@wg0 returns automatically. |
| ☐ Revocation procedure documented | Know how to remove a lost peer, reload WireGuard, and issue a replacement key. |
| ☐ Privacy claims kept realistic | Document that the VPS provider, destination accounts, and browser state can still identify activity. |
Official Technical and BitBrowser Reading
Ubuntu 26.04 notes • Ubuntu WireGuard guide • WireGuard quick start • Ubuntu firewall • VPN vs BitBrowser • Private browsing • BitBrowser website |

 Multi-Account Management
 Prevent Account Association
 Multi-Employee Management
Recommended
See More