How to Automate TikTok with BitCloudPhone RPA: A Complete Step by Step Guide
 2026.05.21 02:22
 YT.Shi
Have you ever wished you could keep your TikTok accounts active around the clock without staring at your phone all day? BitCloudPhone RPA makes that possible. It turns a virtual cloud phone into a tireless assistant that taps, swipes, and scrolls just like a real person.
This guide walks you through the entire process, from setting up your cloud phone to running your first automated TikTok task. No technical jargon, just clear steps you can follow right now.
What Exactly is Cloud Phone RPA?
RPA stands for Robotic Process Automation. On BitCloudPhone, this means you can program a cloud based phone to mimic human actions on the screen: opening apps, swiping through videos, typing text, and much more. Since everything runs in the cloud, your automated phone stays online 24 hours a day, 7 days a week. You do not need to keep your computer on or maintain a physical device.
For TikTok users, this opens up a world of possibilities. You can warm up new accounts by simulating natural browsing behavior, schedule repetitive engagement tasks, or manage multiple profiles without constant manual effort. It saves time, reduces labor costs, and keeps your operations running smoothly in the background.
Before You Start: A Few Essentials
A successful RPA task always combines four things: an RPA workflow, a cloud phone environment, an execution schedule, and a task type. Missing any one of these can cause the task to fail, so it helps to understand the full picture before you dive in.
Here is what you need to check first:
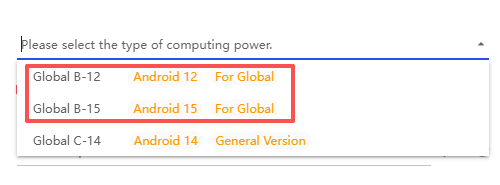
● Supported cloud phone models: Only the Computing Power 12 and Computing Power 15 device models support RPA. When you create your cloud phone environment, make sure you select one of these two.
● Account balance: RPA tasks consume cloud phone resources hourly. If your account balance runs out, the environment stops and your task will fail. Keep a sufficient balance to maintain uninterrupted automation.
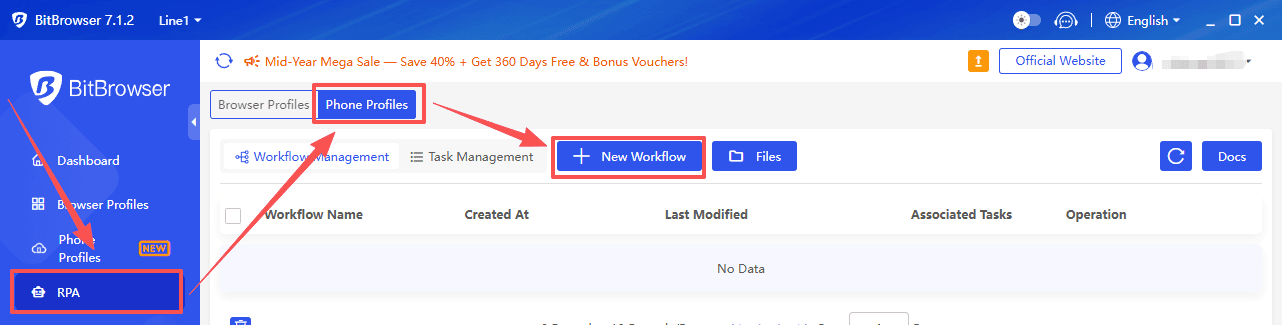
● Where to find RPA: In the Bit Cloud Phone client, look at the left side menu. Click on RPA and then select Phone profiles to enter the main workspace.
Step 1: Create Your Cloud Phone Environment
If you do not have a cloud phone yet, here is how to set one up quickly.
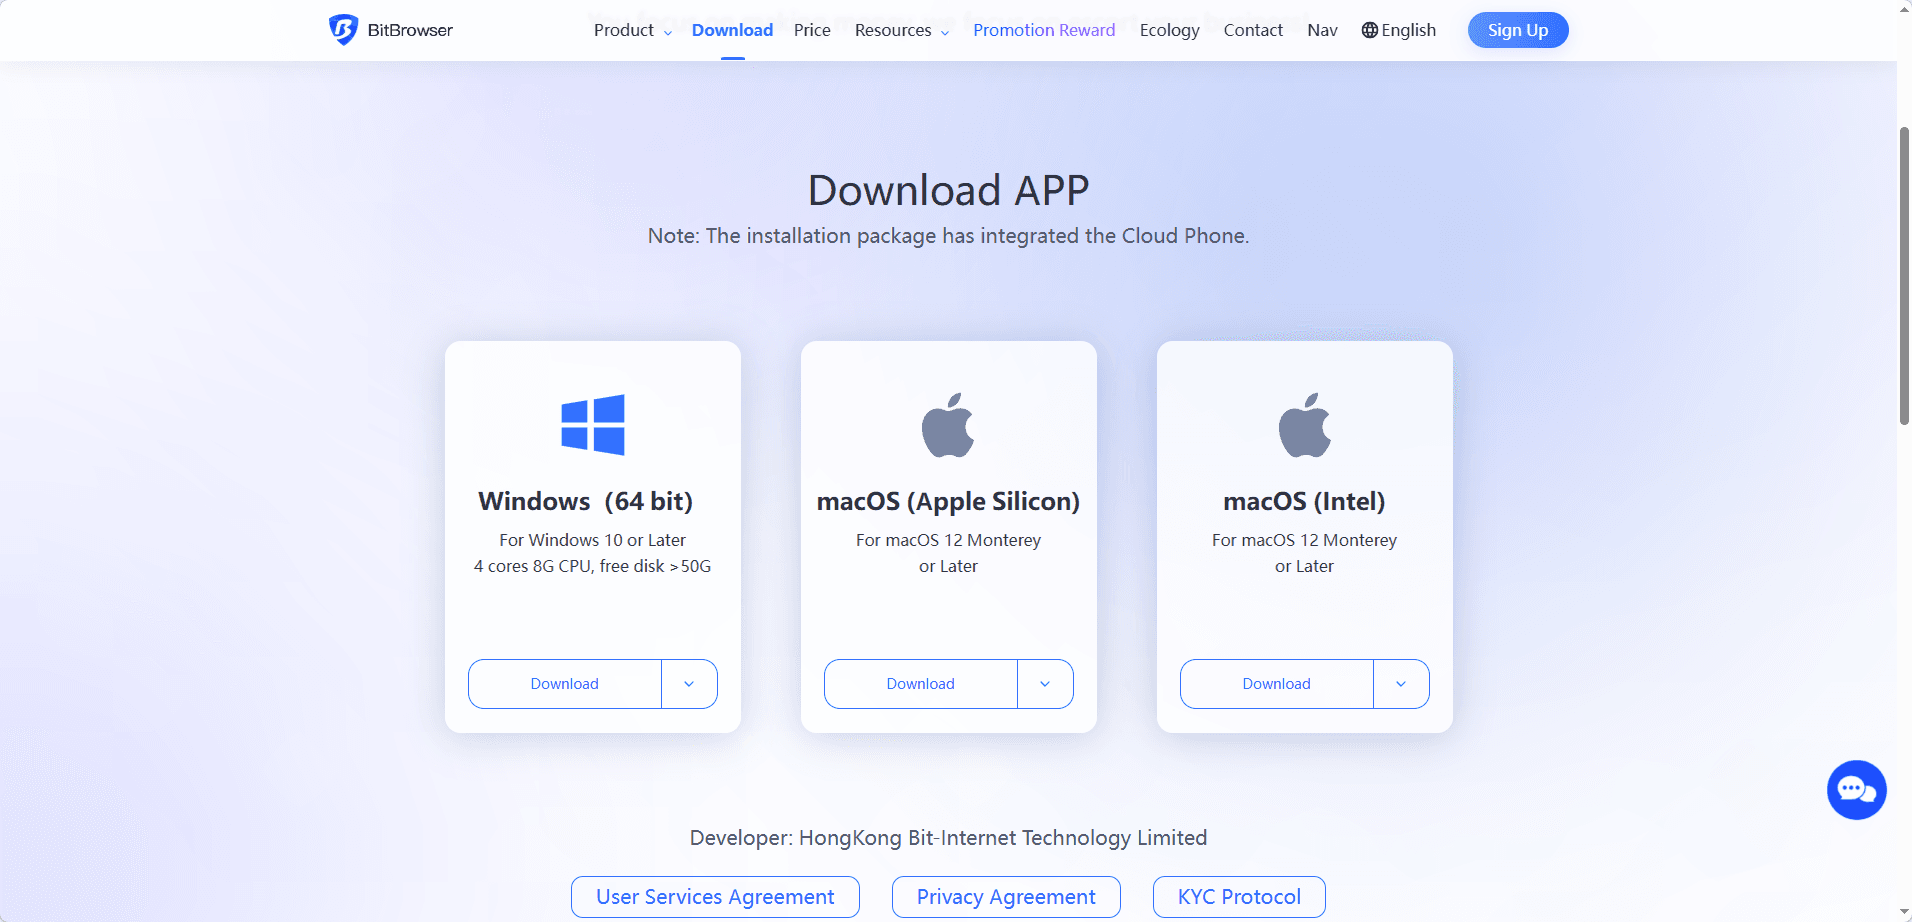
1. Register and log in. Go to the BitBrowser official website and sign up for an account. New users usually get some free trial hours, which is perfect for testing the RPA features without spending money right away. Then, download the BitBrowser.
2. Navigate to the Cloud Phone page. Find the “Phone Profiles” section and click the "Add".
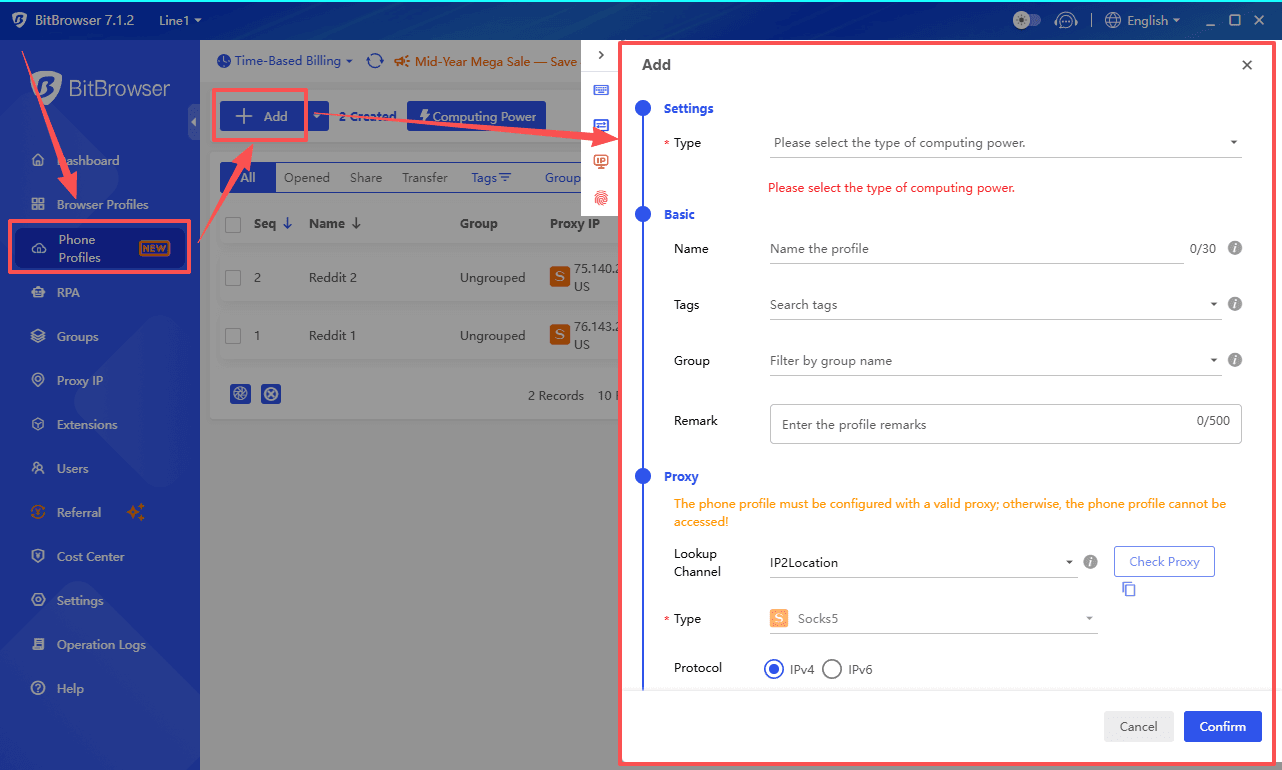
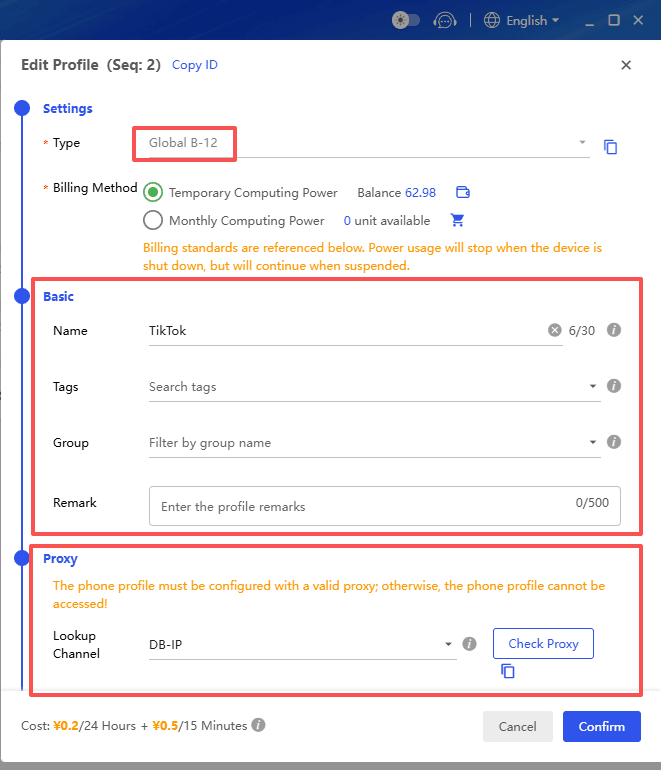
3. Configure the environment. A setup window will appear. Remember that you must pick the Computing Power 12 or 15. Select your preferred billing method, fill in a name, add a proxy IP, and click confirm. Your cloud phone will be ready in a few moments.
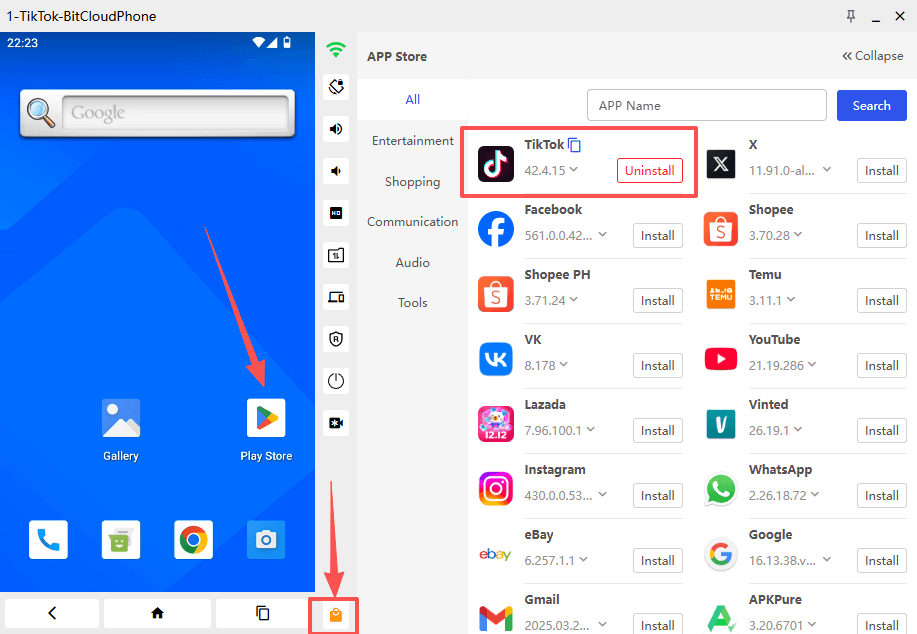
Next, install TikTok on this cloud phone. You have three options. You can use the built in app market to search and install it directly. You can open the cloud phone’s browser and download the TikTok APK. Or you can upload an APK file from your local computer using the file transfer feature. Once TikTok is installed, your environment is fully prepared.
Step 2: Build Your First TikTok RPA Workflow
Now comes the core part, creating the automation process. We will build a simple workflow that opens TikTok, scrolls through the feed for a while, and then closes the app. Once you master this, you can easily expand it to more complex tasks.
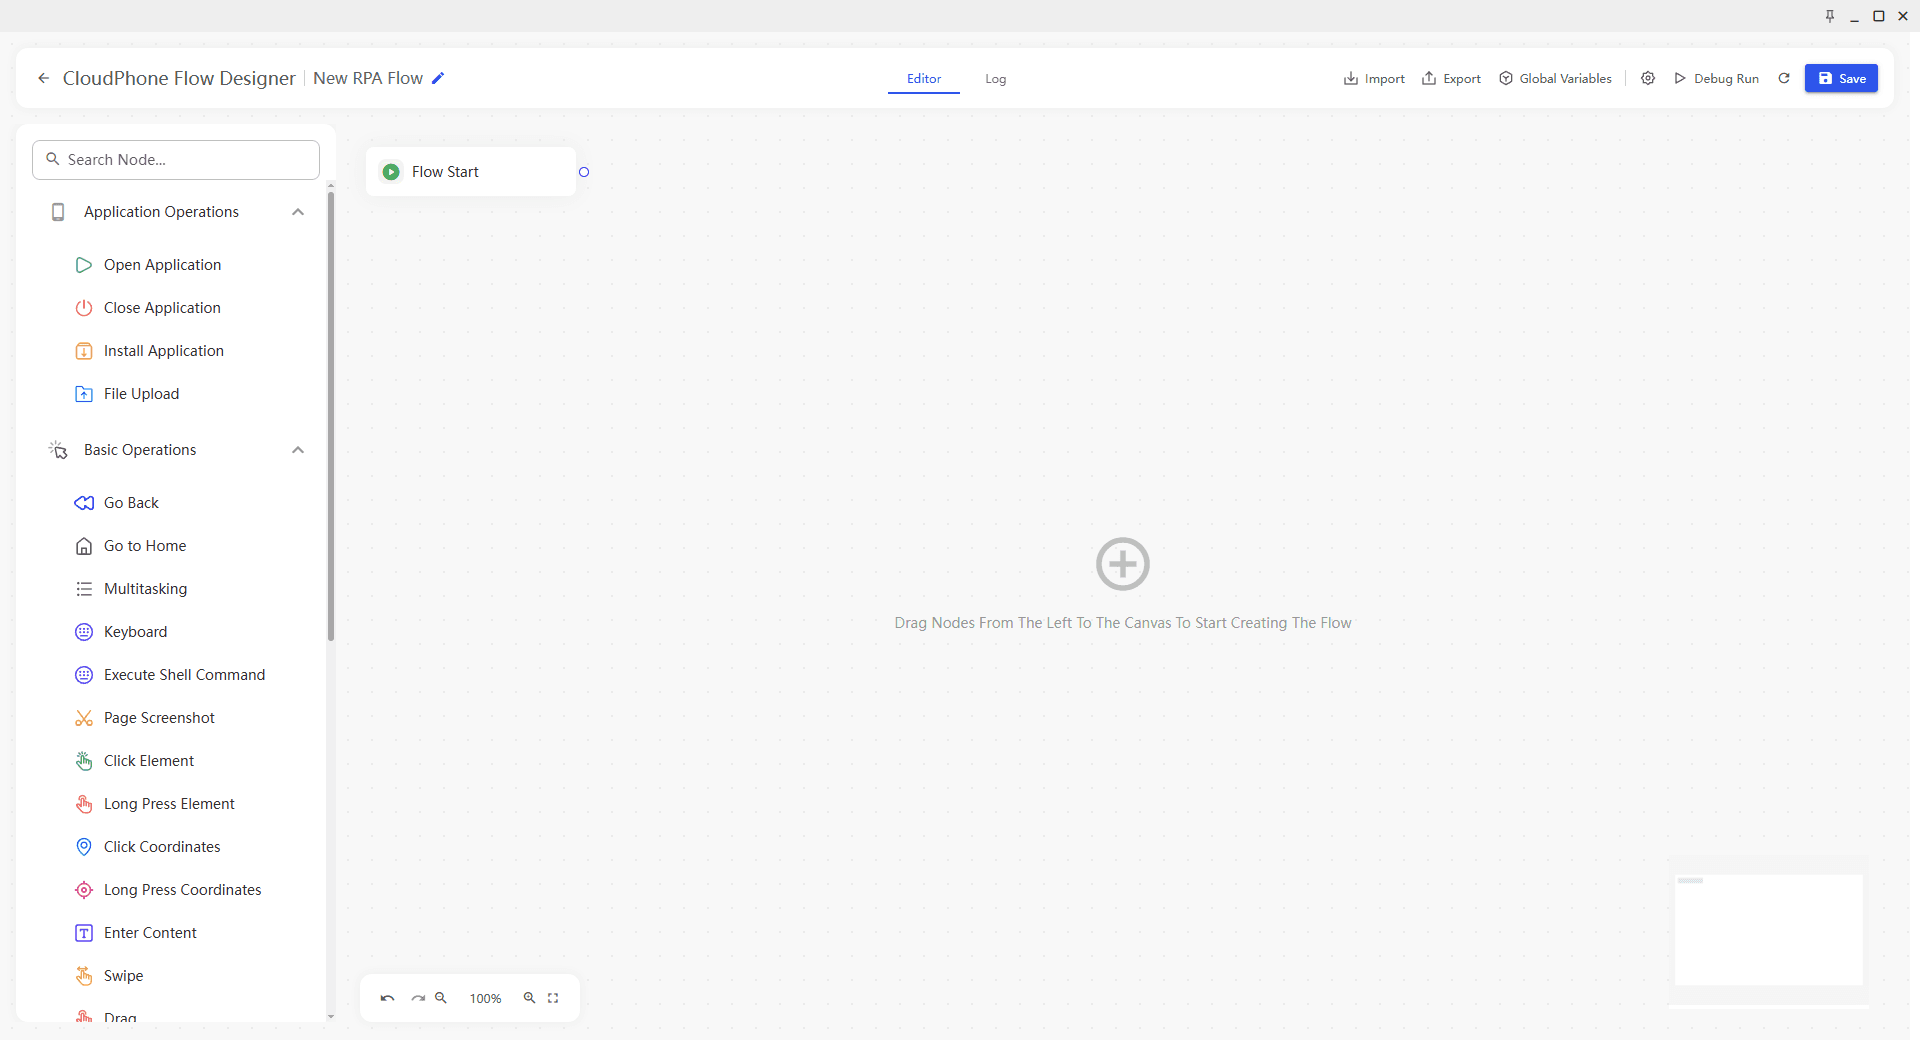
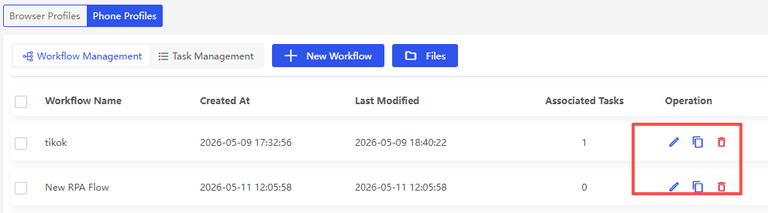
Click New Workflow from the RPA section. The editor screen shows five categories of actions on one side, and a blank canvas on the other where you build the flow. These categories are:
● Application Operations: Open, close, install, and upload apps.
● Basic Operations: Page back, click, input text, and multitasking actions.
● Wait Delay: Pause the script or wait for a specific element to appear.
● Data Retrieval: Extract text, read notifications, or write data to a file.
● Flow Control: Loops, conditions, and task ending commands.
Follow these steps to assemble the workflow:
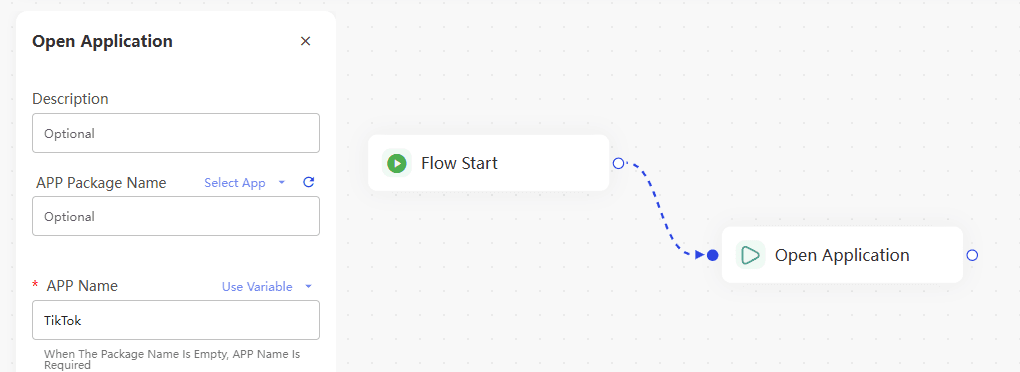
1. Add the Open App action.
From the Application Operations area, find Open Application and drag it onto the canvas. Click the small settings icon on this block. A field will appear where you type the app name. Enter TikTok exactly as it appears on your cloud phone’s home screen.
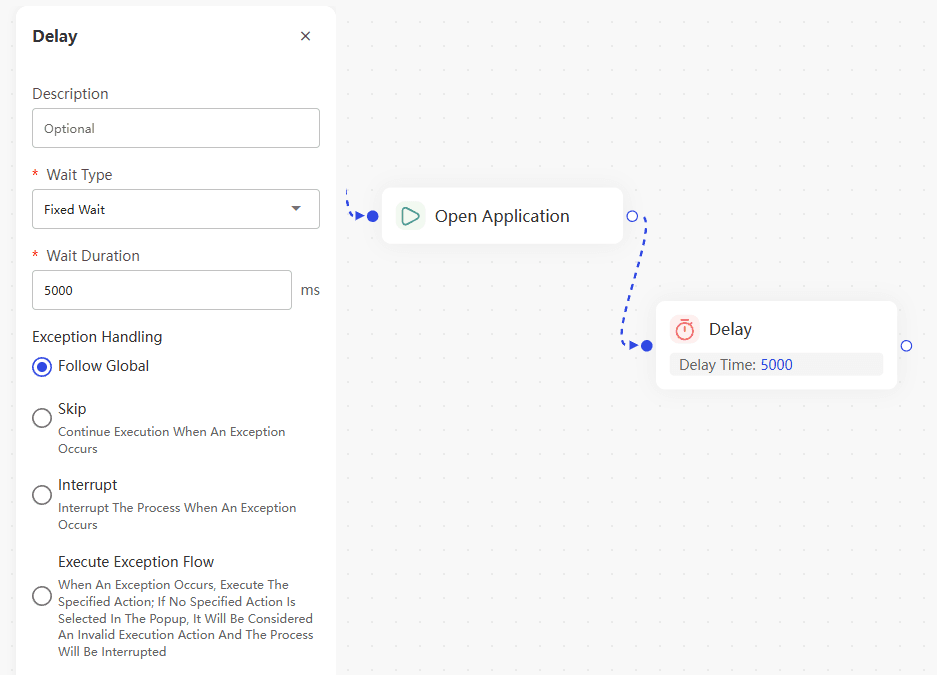
2. Insert a Delay.
Right after opening TikTok, the app needs time to load videos and connect to the network. If the next step runs too fast, the workflow will break. Drag Delay from the Wait Delay category and place it below the Open App block. Set a wait time of 5 to 8 seconds. This gives TikTok enough room to fully initialize.
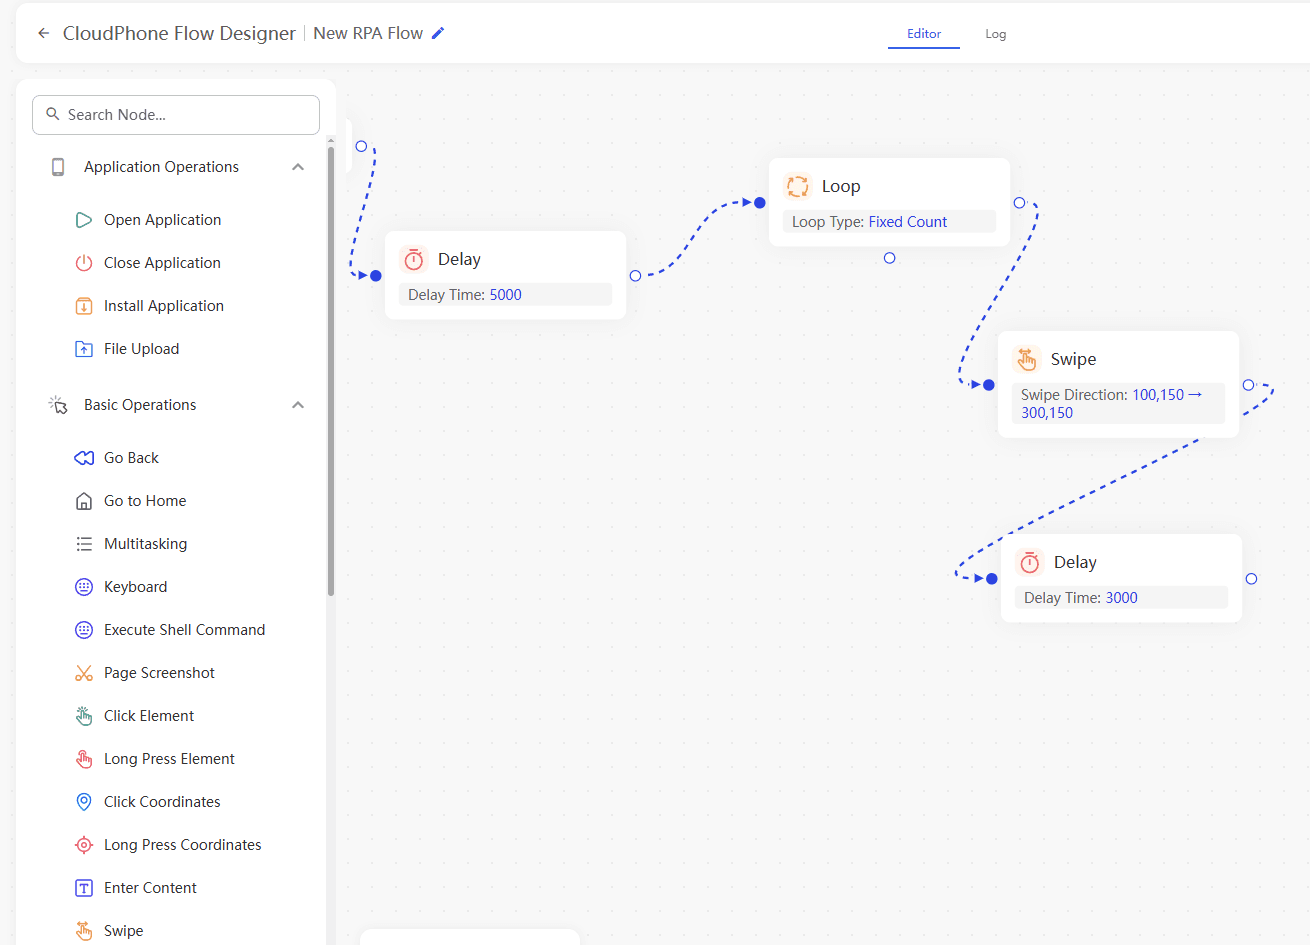
3. Create a browsing Loop.
Real users do not just open an app and stare at one post. To simulate natural behavior, we need a loop that scrolls through content repeatedly. Drag Loop from the Flow Control group into the canvas.

Now, inside this loop container, add two more actions:
● Swipe: Drag a Swipe action into the loop. Click its settings to define the swipe direction (upwards, like a real thumb scroll) and the swipe duration. A good starting point is an upward swipe lasting 800 to 1200 milliseconds. Pro tip: open your cloud phone in a separate window, go to the TikTok feed, and use the coordinate recording feature if available. This captures a realistic finger movement.
● Delay again: Add another short Delay after the swipe, maybe 3 to 6 seconds. This mimics the time a person spends watching a video before moving on. You can adjust these numbers later based on what looks most natural.
Set the loop to repeat maybe 10 to 20 times, depending on how long you want the browsing session to last. More repetitions mean a longer task.
4. Close the app properly.
After the loop finishes, drag Close App from the App Operations area and place it at the end of the workflow. Again, type TikTok in the app name field. This ensures the task ends cleanly and does not leave apps running in the background.
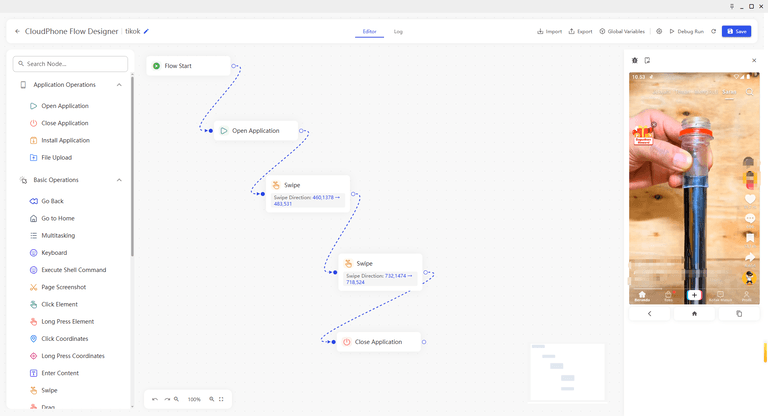
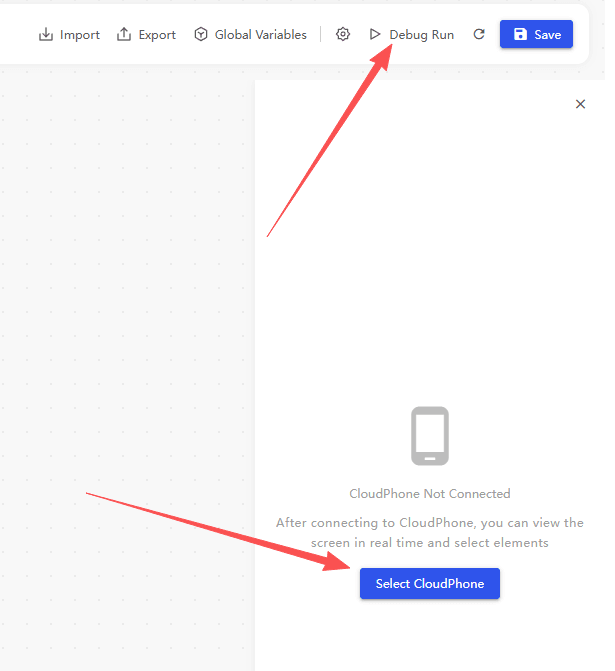
5. Test and save.
Before finalizing, use the Debug Run function. The workflow will execute once while you watch the cloud phone screen. Look for any hiccups: does TikTok open correctly? Are the delays long enough? Does the swipe actually move the feed? Adjust any parameters that feel off. Once satisfied, click Save and give your workflow a name like “TikTok”.
Important Notes
● When selecting a Cloud Phone environment for running and debugging, the Cloud Phone must be in the Running state.
● When executing a node or a complete process, the Cloud Phone must be in the Running state. If it is not, click Start Debugging.
Step 3: Schedule the Task to Run Automatically
A saved workflow is only a template. To make it run on its own, you need to create a task that ties the workflow to a cloud phone and a time schedule.
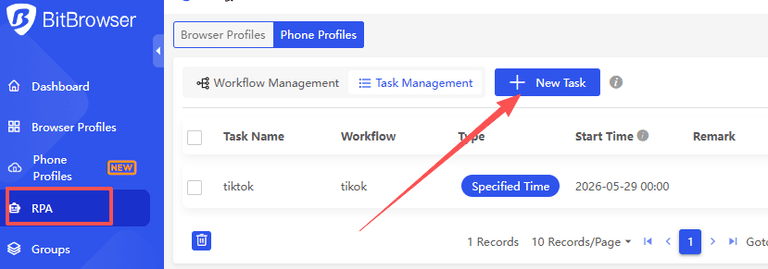
Click New Task and fill in the following details:
● Task Name: Something recognizable, for example “Morning TikTok Warmup”.
● Workflow: Select the workflow you just saved from the dropdown list.
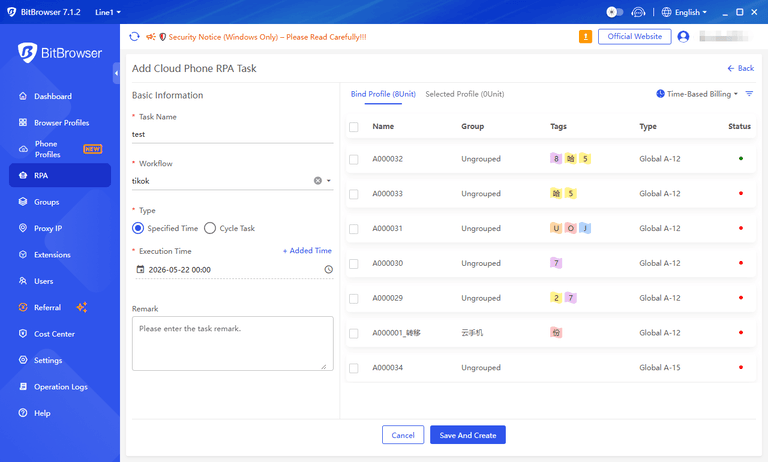
Now choose your schedule type. You have two main options:
● Specified Time (One time or Daily): If you want the task to run at a specific moment, pick a date and time. If you want it to repeat every day, set a daily time like 10:00 AM. You can also add multiple daily times if needed.
● Cycle Task (Loop Task): This option lets you set a start time, an end time, and an interval. For example, you could make the task run every 30 minutes between 9:00 AM and 9:00 PM. This is ideal for continuous account nurturing throughout the day.
When the scheduled time arrives, the RPA task will run silently in the background without requiring you to open the mobile profile. You can view the execution progress and results directly through the task status.

Step 4: Monitor Your Tasks and View Logs
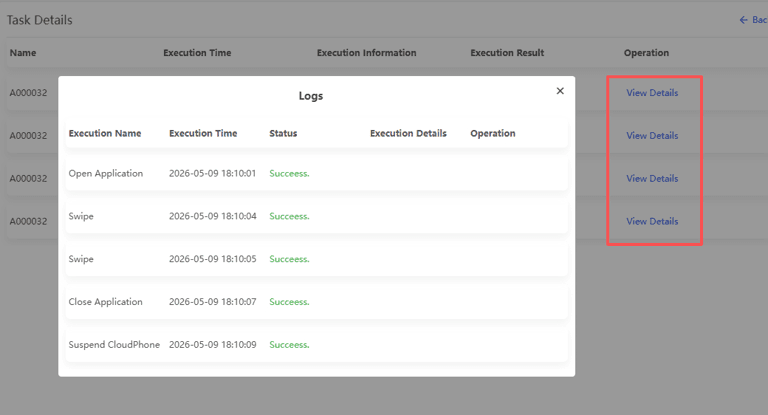
Even though the process is automated, you should check in occasionally to make sure everything runs smoothly. All task activity is recorded in the Task Logs section. Here you can see:
● The exact start and end time of each run.
● The execution status: Success, Failed, Running, or Terminated.
● Detailed error messages if something went wrong, such as a specific action that timed out.
● Intermediate data like which step was last completed.
If a task fails, the logs are your best friend for troubleshooting. Maybe the TikTok interface updated and a button moved. You can then go back to your workflow, adjust the relevant step, and save it again. The task will use the updated workflow on its next run.
Practical Tips for Smooth Automation
Starting with RPA can feel a little like learning to cook. It is best to begin with a very simple recipe and then add more ingredients. Here are some friendly pointers from real user experience:
● Start small. Your first workflow should be something like: Open TikTok, wait a few seconds, perform three swipes, and close. Once that runs flawlessly, add loops, clicks on specific buttons, or interactions with the search bar.
● Use realistic timing. Human behavior is not instant. Vary your delays slightly. Instead of always waiting exactly 5 seconds, you can sometimes wait 4 seconds and sometimes 7 seconds. This makes the automation look less robotic.
● Debug every addition. After adding a new action, run the debug tool immediately. Finding an error early saves a lot of time compared to fixing a huge, untested workflow.
● Keep an eye on resource usage. While your tasks run 24/7 on Computing Power 12 or 15 models, they consume cloud credits continuously. Plan your tasks to align with your budget and operational needs.
Conclusion
BitCloudPhone RPA takes the repetitive grind out of TikTok account management. Instead of manually swiping and tapping for hours, you design the workflow once and let the cloud phone execute it day and night.
This approach is already helping cross border ecommerce sellers, social media managers, and app testers scale their work without burning out.
Start with the simple browsing task described above, and as your confidence grows, explore more advanced sequences. Your 24/7 virtual assistant is just a few clicks away.
 Multi-Account Management
 Prevent Account Association
 Multi-Employee Management
Recommended
See More ![]()