How to Use AI to Control BitBrowser with MCP: Setup Guide and Real Examples
 2026.08.21 09:37
 YT.Shi
BitBrowser 7.1.5 introduces support for MCP, allowing compatible AI tools to interact with BitBrowser through a local MCP server.
Once the connection is configured, you can use natural language to ask an AI assistant to perform everyday BitBrowser tasks. Instead of manually performing every operation in the BitBrowser interface, you can describe what you want to accomplish and let the AI assistant call the appropriate BitBrowser tools.
This guide explains how to connect BitBrowser to an MCP compatible AI tool and provides practical examples of what you can do after the connection is ready.
Note: MCP support is available on BitBrowser client version 7.1.5 and above.
What Is BitBrowser MCP?
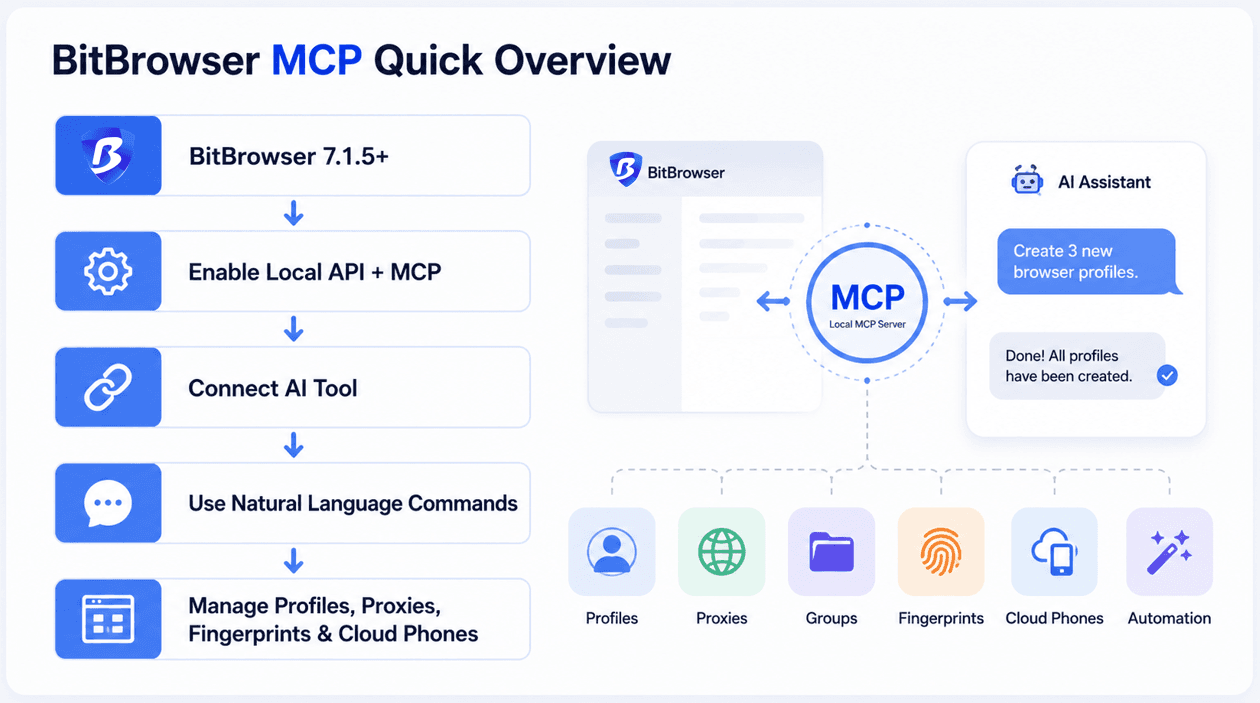
MCP, or Model Context Protocol, provides a standardized way for AI applications to connect to external tools and services.
In BitBrowser 7.1.5, MCP allows compatible AI tools to communicate with the BitBrowser local MCP server. The AI can then use the available BitBrowser tools to perform operations based on your instructions.
Depending on the tools available in your setup, this can include creating and managing Browser Profiles, configuring proxies, organizing profiles into groups, updating fingerprint settings, opening or closing profiles, and managing cloud phones.
For example, instead of manually creating three Browser Profiles, assigning them to a group, and checking their status, you can give the AI a task such as:
Create three new Browser Profiles, put them in a new group, and verify that they were created successfully.
The AI can determine which BitBrowser tools are needed and execute the required operations.
What Can BitBrowser MCP Do?
BitBrowser MCP covers a range of everyday management tasks. The main capabilities include:
Capability | Supported Operations |
|---|---|
Browser Profiles | Create, update, open, close, delete, and query Browser Profiles |
Fingerprint | Randomize browser fingerprints and clear browser cache |
Proxy | Configure and update proxy settings and check proxy status |
Groups | Create, update, delete, and manage Browser Profile groups |
Cloud Phones | Create, update, open, restart, reset, suspend, shut down, and delete cloud phones |
Tags | Create, update, delete, and manage tag relationships |
ADB | Retrieve ADB information and enable or disable ADB for cloud phones |
Window Management | Read and adjust Browser Profile window positions and sizes |
The available operations can also be combined into a single workflow. This is where MCP becomes particularly useful: you can describe the result you want in natural language instead of manually selecting individual operations.
What You Need Before Connecting
Before setting up BitBrowser MCP, make sure you have:
1. BitBrowser 7.1.5 or later
2. Local API Authentication enabled in BitBrowser

3. An AI tool that supports custom MCP servers
4. Access to the MCP configuration generated by BitBrowser
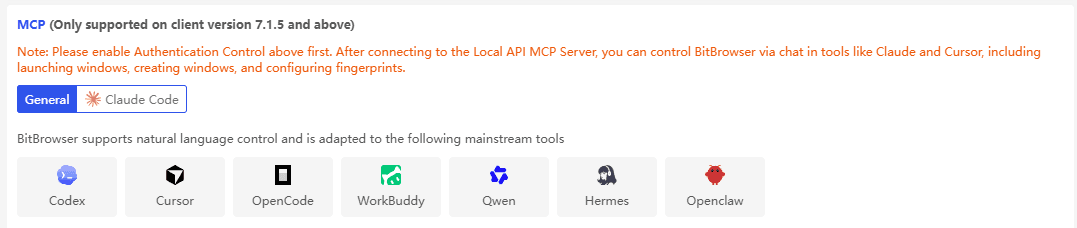
BitBrowser currently provides configuration options for several mainstream AI tools, including Codex, Cursor, OpenCode, WorkBuddy, Qwen, Hermes, and OpenClaw.

The exact location of MCP settings varies between AI tools. Look for options such as MCP Servers, Tools, Integrations, Connectors, or Custom MCP.
If your AI tool is not listed in BitBrowser, you can use the General configuration.
Step 1: Enable Local API and Get the MCP Configuration
Make sure you are using BitBrowser 7.1.5 or later, then go to:
Settings → Browser Settings → Local API
First, turn on Enable Authentication Control. BitBrowser will generate an API Token and show the corresponding Http Request Headers:
Key: x-api-key

Value: <your API Token>
The default Local API and MCP addresses are:
Local API: http://127.0.0.1:54345

MCP:       http://127.0.0.1:54345/mcp
If you have changed the Local API Port, use the address shown in your BitBrowser installation.
Next, scroll to the MCP section and select your AI tool. BitBrowser provides configurations for Codex, Cursor, OpenCode, WorkBuddy, Qwen, Hermes, and OpenClaw, as well as General and a dedicated Claude Code configuration.
Copy the configuration from MCP Configuration Prompt and add it to your AI tool's MCP settings.
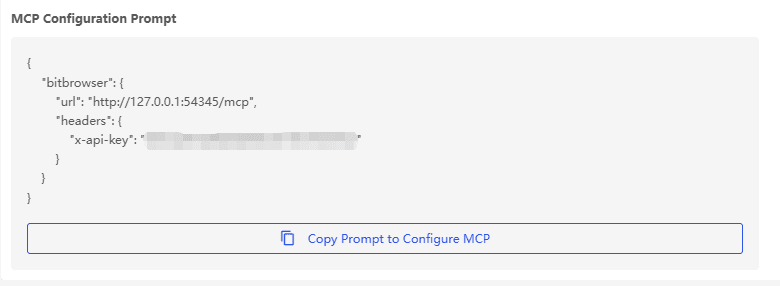
Important: Use the configuration generated by BitBrowser whenever possible. Do not change the
x-api-keyheader or API Token, and keep your API Token private. If you reset the token, update the MCP configuration accordingly.
Step 2: Add BitBrowser to Your AI Tool
Open the settings of your AI tool and find its MCP or connector configuration. The exact interface depends on the application. You may see options such as:
· MCP Servers
· Custom MCP
· Tools
· Integrations
· Connectors
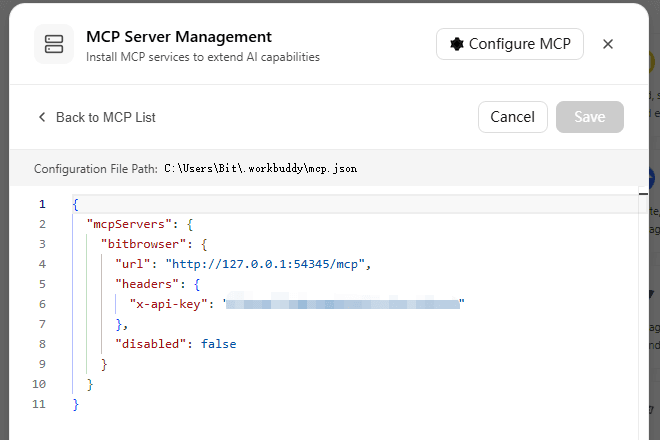
Create a new MCP server and paste the configuration copied from BitBrowser.
General Configuration
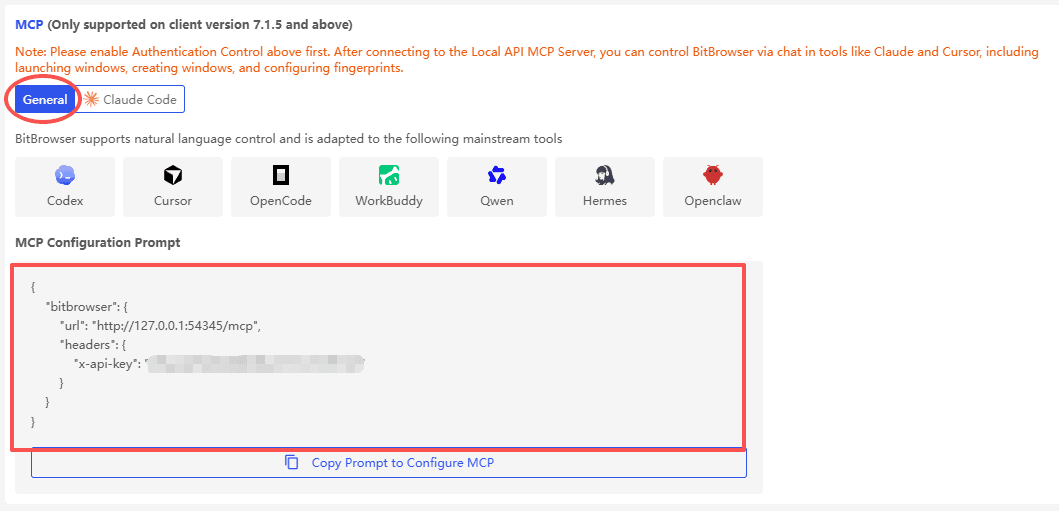
For a compatible client using the general configuration, the setup will look similar to this:
{
  "mcpServers": {
    "bitbrowser": {
      "url": "http://127.0.0.1:54345/mcp",
      "headers": {
        "x-api-key": "<YOUR_API_TOKEN>"
      }
    }
  }
}
Replace:
<YOUR_API_TOKEN>with the API Token generated by BitBrowser.
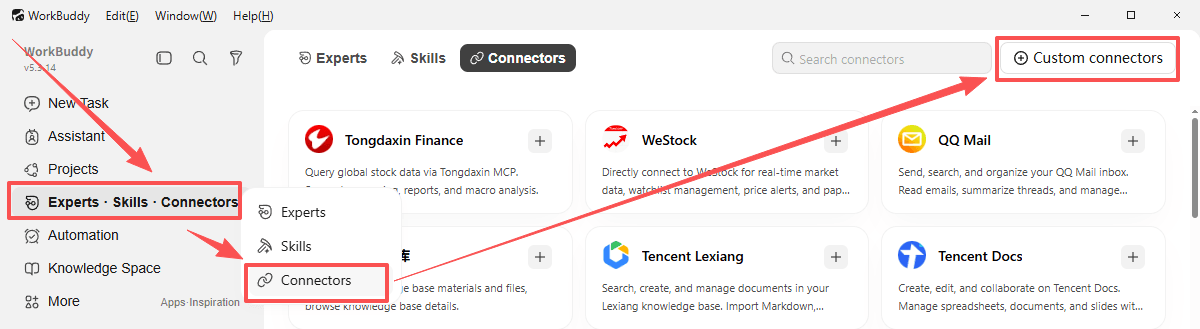
Example: WorkBuddy
In WorkBuddy, open the MCP or connector settings and add a new MCP server. Paste the BitBrowser configuration into the server configuration field.
Quick Setup: Install BitBrowser MCP via AI Chat
In WorkBuddy, you can also paste the copied configuration directly into the chat box and ask the AI to help install the BitBrowser MCP service. The AI can then guide you through the next steps based on its available MCP features.
For example, enter:
Please help me install the BitBrowser MCP service.

Configuration:

{
    "bitbrowser": {
        "url": "http://127.0.0.1:54345/mcp",
        "headers": {
            "x-api-key": "<YOUR_API_TOKEN>"
        }
    }
}
Replace <YOUR_API_TOKEN> with the API Token generated by BitBrowser before sending the configuration.
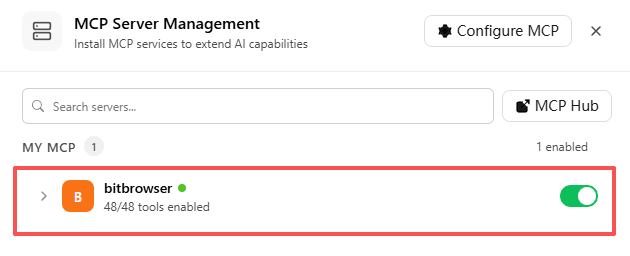
Follow the AI's instructions to complete the setup and make sure the bitbrowser MCP server is enabled and its tools have loaded successfully.
Important Notes
Do not change the x-api-key header name.
If BitBrowser provides a tool specific configuration, use that configuration instead of manually converting it to the example above.
After saving the configuration, make sure the bitbrowser MCP server is enabled and that its tools have loaded successfully.
Step 3: Test the MCP Connection Before Making Changes
Before asking the AI to create or modify anything, test the MCP connection with a read-only request.
For example:
Show me my current BitBrowser setup.

List all existing Browser Profiles and cloud phones, including their names, groups, and status.

Do not make any changes.
If the AI can retrieve and return the information correctly, the MCP connection is working.
This simple test helps confirm that the AI can communicate with BitBrowser before you start managing profiles or other settings.
Step 4: Create and Organize Browser Profiles with AI
Once the connection is confirmed, you can start using MCP for actual BitBrowser operations.
For example, you can ask the AI to create several Browser Profiles and organize them into a group.
Create 3 new Browser Profiles named MCP_Demo_01, MCP_Demo_02, and MCP_Demo_03.

Use English (US) as the browser language for all three profiles.

Create a new group called "MCP Demo" and add all three profiles to it.

Do not modify any existing Browser Profiles.

After completing the task, verify that all three profiles were created successfully and are in the correct group.
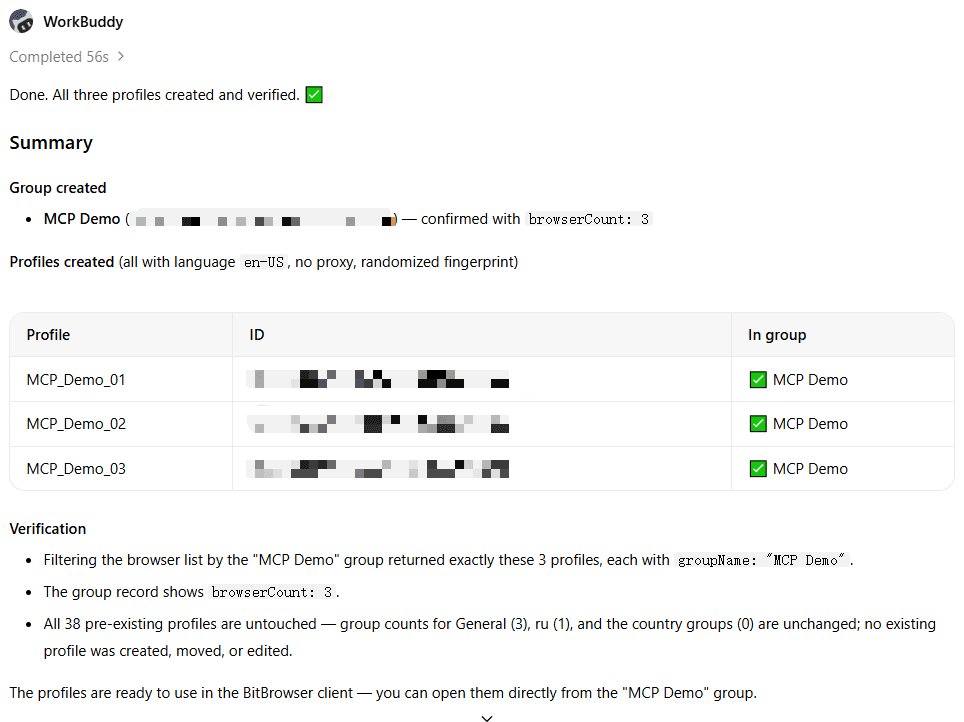
This single request involves several operations:
· Create the Browser Profiles.
· Apply the requested language settings.
· Create a group.
· Add the profiles to the group.
· Check the final result.
You do not need to specify the individual MCP tool names in the prompt. The AI can select the appropriate BitBrowser tools based on the task.
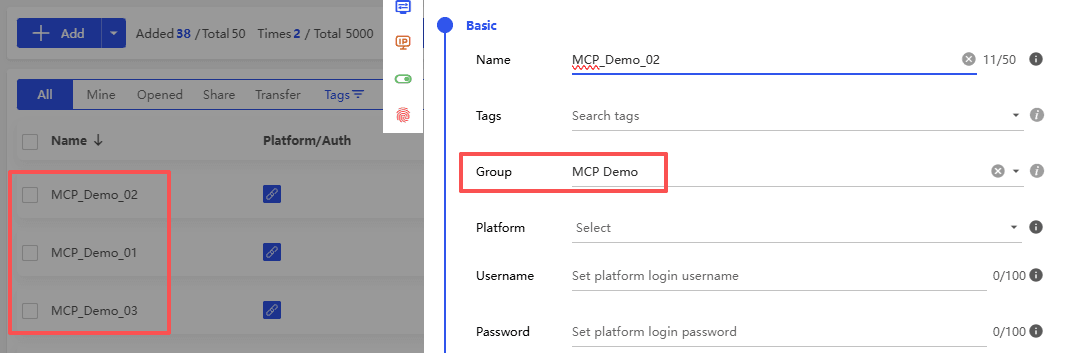
After the AI reports that the operation is complete, you can also check the Browser Profiles page in BitBrowser to confirm the result visually.
Step 5: Configure Proxies with MCP
Proxy configuration is another practical use case.
You can ask the AI to configure different proxies for different Browser Profiles.
For example:
For the three Browser Profiles in the "MCP Demo" group, configure the proxy settings I provide below.

Use one proxy per profile and keep all other Browser Profile settings unchanged.

MCP_Demo_01:
SOCKS5
Host: proxy1.example.com
Port: 1080

MCP_Demo_02:
SOCKS5
Host: proxy2.example.com
Port: 1080

MCP_Demo_03:
SOCKS5
Host: proxy3.example.com
Port: 1080

After updating the profiles, verify that each profile has the correct proxy configuration.
The important part of this type of instruction is to clearly state what should and should not be changed.
For example, if you only want to update proxies, explicitly tell the AI:
Keep all other Browser Profile settings unchanged.
If your proxy requires authentication, provide the required credentials only through a secure private session. Avoid placing proxy passwords in public prompts or documentation.
Step 6: Manage Browser Profiles with MCP
BitBrowser MCP allows you to update, manage, and check existing Browser Profiles.
For example, you can change specific settings while keeping others unchanged:
Change the browser language of MCP_Demo_01 and MCP_Demo_02 to French.

Keep their proxy settings, group assignments, and other fingerprint settings unchanged.

Verify the changes after updating.
You can also manage fingerprints or profile status:
Randomize the browser fingerprints for MCP_Demo_02 and MCP_Demo_03.

Do not change proxy settings, language, or group assignments.
Open MCP_Demo_01 and check its current status.
When sending commands, specify what should be changed and what should remain unchanged. For important operations, ask the AI to verify the final result.
Step 7: Combine Multiple Operations into One Workflow
The biggest advantage of MCP becomes more obvious when several operations need to be performed together.Instead of giving the AI a separate command for every action, you can describe the complete task.
For example:
Prepare a new BitBrowser setup for my project.

Create 5 new Browser Profiles named Project_01 through Project_05.

Use English (US) as the browser language.

Create a group called "Project Profiles" and add all five profiles to it.

Configure the proxy settings I provide for each profile, using one proxy per profile.

After everything is configured, verify that:
1. All five profiles exist.
2. All five profiles are in the "Project Profiles" group.
3. Each profile has the correct proxy.
4. The browser language is set to English (US).

Do not modify any existing profiles outside this new group.
The AI can break this request into multiple BitBrowser operations and then verify the final state.
This is where MCP becomes more than simply another way to call an API. You can describe the outcome, while the AI handles the individual tool calls needed to achieve it.
Keep sensitive information private
Never expose your API Token in a public prompt, screenshot, article, repository, or social media post.
The same principle applies to proxy usernames, passwords, and other credentials.
Troubleshooting BitBrowser MCP
The AI cannot connect to BitBrowser
Check the following:
· BitBrowser is running.
· You are using BitBrowser 7.1.5 or later.
· Settings → Browser Settings → Local API is accessible.
· Enable Authentication Control is turned on.
· The MCP endpoint is correct.
· The x-api-key header is included.
· The API Token is correct.
· The bitbrowser MCP server is enabled in your AI tool.
If everything appears correct, reload the MCP connection or restart the AI tool.
The AI connects but cannot perform an operation
First ask the AI to list or inspect the relevant Browser Profile or cloud phone. This can help determine whether the issue is related to the MCP connection or the specific operation.
For example:
Check the current status of MCP_Demo_01 and tell me whether it is available for modification.

Do not make any changes.
If the AI can retrieve the profile correctly but the requested operation fails, keep the actual error message and investigate that specific operation instead of repeatedly sending the same command.
The AI reports success but the BitBrowser page has not changed
The BitBrowser interface may need to be refreshed before newly created or updated items appear.
Refresh the relevant page and check the current state.
You can also ask the AI to query the item again:
Check the current state of MCP_Demo_01 and confirm whether the previous update was applied.

Do not make any additional changes.
This is safer than immediately repeating the original command.
Final Thoughts
BitBrowser MCP provides a new way to interact with BitBrowser.
Instead of manually opening the BitBrowser interface for every routine operation, you can connect an MCP compatible AI tool and use natural language to manage Browser Profiles, fingerprints, proxies, groups, cloud phones, and other supported features.
For simple tasks, this can save a few manual steps. For larger workflows, the advantage becomes more noticeable because one instruction can combine multiple operations and verify the result afterward.
If you are new to MCP, start with a read-only command to confirm the connection, then move on to simple profile operations before building more complex workflows.
Once you are comfortable with the basic commands, you can gradually turn repetitive BitBrowser tasks into AI assisted workflows.

 Multi-Account Management
 Prevent Account Association
 Multi-Employee Management
Recommended
See More